
Forgetting your Apple ID password is a uniquely modern frustration. It feels like you’ve been locked out of your entire digital life—from your photos and messages to your apps and subscriptions. But don’t panic. Getting back in is usually more straightforward than you might imagine.
The absolute fastest way to reset your password is by using a trusted Apple device—an iPhone, iPad, or Mac that you’re already signed into. This is Apple’s preferred method because it uses your device’s passcode for instant verification, letting you create a new password on the spot.
Your Quickest Paths to Apple ID Password Recovery
When you’re locked out, the goal is to find the path of least resistance. In almost every case, that path runs through a device Apple already recognises as yours.
This image shows just how effective different recovery methods are.
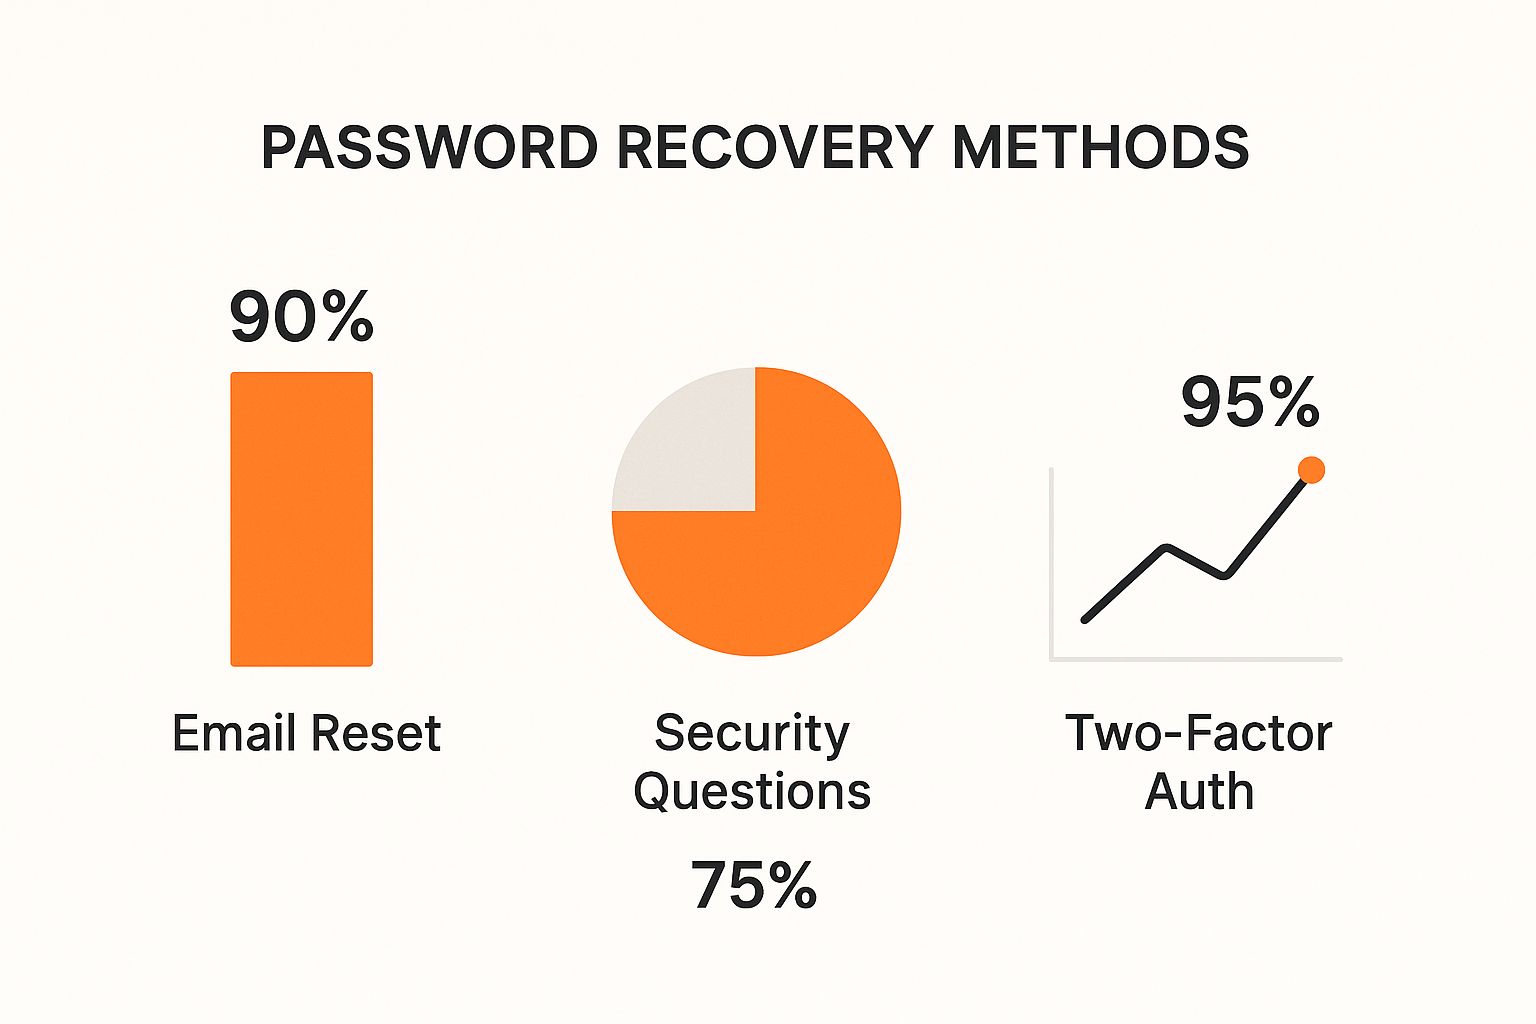
As you can see, having two-factor authentication enabled gives you the highest chance of success. It’s a crucial layer of security that really pays off when you need it most.
Use a Trusted Device You Already Own
The most direct and secure route is to use a device you’re already logged into. In Nigeria, where smartphone usage is on the rise with a penetration rate of around 50% in 2024, many of us have an iPhone or iPad handy for exactly this purpose.
Here is a practical, step-by-step guide:
- Unlock your iPhone or iPad.
- Open the Settings app (the grey gear icon).
- Tap on your name displayed at the very top of the screen.
- Select Sign-In & Security.
- Tap Change Password.
- Enter your device passcode when prompted (the same code you use to unlock the screen).
- Type in your new password and then type it again to confirm.
The logic here is beautifully simple: if you can unlock your device, Apple trusts that you’re its rightful owner. This clever shortcut means you can skip the old, clunky security questions and avoid waiting around for verification emails.
Navigating your digital security is a vital skill, not unlike knowing the steps to start an online business. Both require a clear process and a bit of know-how.
But what if you don’t have a trusted device nearby? Don’t worry, web-based recovery is your next best option, though it does involve a few more steps.
To help you choose the best route, here’s a quick comparison of the main recovery options.
Recovery Method Comparison At a Glance
| Method | Requirements | Speed | Best For |
|---|---|---|---|
| Trusted Device | Access to an iPhone, iPad, or Mac already signed in; Device passcode | Instant | The fastest and most secure option for anyone with their device on hand. |
| Apple Support App | A friend’s or family member’s iPhone/iPad with the Apple Support app | Fast | When you’re away from your own devices but can borrow one from someone you trust. |
| Web Recovery (iforgot) | Your Apple ID email and a trusted phone number | Can be slow | A last resort if you don’t have access to any Apple devices. May involve a waiting period. |
Ultimately, using a trusted device is the gold standard. It’s designed to be quick, painless, and secure, getting you back into your account in minutes.
How to Reset Your Password on a Trusted iPhone or iPad
If you’ve got your unlocked iPhone or iPad handy, you’re in luck. This is by far the simplest and most secure way to get back into your Apple ID. Apple’s system is built on the idea that it can trust the device you use every day, letting you sidestep the headache of email recovery links or long-forgotten security questions.
Practical example: You’re trying to download an app, the password box pops up, and your mind just goes blank. It happens to all of us. As long as your iPhone is in your hand, you can sort this out in less than two minutes. It’s a beautifully practical solution.
Everything starts in your device’s Settings app—the central hub for your entire Apple account.
Navigating to the Password Reset Screen
Here’s the step-by-step guide to get to the reset screen:
- Open the Settings app on your iPhone or iPad.
- Tap on your name, which you’ll see right at the very top. This takes you straight to your main Apple ID management page.
- Look for and select the Sign-In & Security option.
- On the next screen, simply tap Change Password.
That’s it. This is the most direct route to kickstarting the reset process, all thanks to your device’s built-in trust. It’s a core part of what makes Apple’s security feel so seamless.
Here’s a look at the ‘Sign-In & Security’ screen, so you know exactly what to look for before tapping ‘Change Password’.
As you can see, Apple lays out your sign-in options clearly, with “Change Password” front and centre, making it easy to spot when you’re in a pinch.
The real beauty of this method is how immediate it is. By simply asking for your device passcode—something only you should know—Apple instantly confirms it’s you without any fuss.
After you punch in your passcode, you’ll be prompted to create and then verify a new Apple ID password. It’s designed to be that straightforward. If you want a more comprehensive walkthrough, you can learn more about how to change your Apple ID password in our dedicated guide.
Just be sure to pick something strong but memorable to keep your account safe from now on.
Using Your Mac for a Quick Password Reset
Your Mac is often the quickest way to get back into your Apple account. If you’re already logged into your Mac with your user password, Apple considers the device trusted, which makes the whole process surprisingly simple.
Practical example: You’re at your desk, trying to log into iCloud.com on your browser, but the password isn’t working. Instead of hunting down your iPhone, you can just use your Mac in a few clicks. The steps change a little depending on which version of macOS you’re running, but the core idea is always the same: prove you’re you by entering your Mac’s login password.

Finding the Reset Option in System Settings
For anyone on a modern Mac with macOS Ventura or newer, the process feels a lot like it does on an iPhone. You’ll start by heading into System Settings.
Here’s the step-by-step process:
- Click the Apple menu () in the top-left corner of your screen.
- Select System Settings.
- Click your name, which you’ll find at the top of the sidebar.
- Choose Sign-In & Security.
- Finally, click the Change Password button.
At this point, you’ll be prompted to type in the password you use to unlock your Mac. Once you enter it correctly, you can set a new Apple ID password straight away.
This is one of the real strengths of the Apple ecosystem. Your Mac’s login password doubles as a security key, giving you a secure and incredibly convenient way to verify your identity without needing another device.
If you’re working on a slightly older Mac, don’t worry—the process is just as straightforward, but you’ll start in a different place.
Steps for Older macOS Versions
On Macs running macOS Mojave or an earlier version, you’re looking for System Preferences instead of System Settings. The layout might look a bit dated, but it gets the job done.
Once you have System Preferences open, here’s what to do:
- Click the Apple menu () and choose System Preferences.
- Click on the Apple ID option (or iCloud in very old versions).
- Select Password & Security in the sidebar on the left.
- Hit the Change Password button.
After that, just follow the prompts on the screen. It will almost certainly ask for your Mac’s administrator password to confirm the change. This built-in security means that no matter how old your Mac is, you have a reliable path to reset your Apple ID password and get on with your day.
Navigating Account Recovery Without a Trusted Device
It’s a frustrating scenario we’ve all dreaded: you’re locked out of your Apple ID, your password is a complete blank, and you can’t get to a trusted device. Don’t worry, there’s still a way forward, but it does require a bit of patience. Your lifeline here is Apple’s official Account Recovery process, handled through their dedicated website.
Think of this method as your safety net for when you’ve run out of other options. Apple designed it to be a secure, deliberate process to verify it’s really you without putting your account at risk. You’ll be asked for information only you should know, like a trusted phone number, to prove you’re the rightful owner.
Kicking Off the Recovery Process
Here is the step-by-step guide to start the account recovery process online:
- Open any web browser and go to iforgot.apple.com.
- Enter your Apple ID email address and click Continue.
- Enter the trusted phone number associated with your account and click Continue.
- Apple will now present you with options. Since you don’t have a trusted device, follow the prompts for “Don’t have access to any of your devices?”.
- The system will guide you through the final steps to begin the automated account recovery waiting period.
You’ll land on a straightforward page like this, where you just pop in your email or phone number to begin.
This page is your gateway to getting back into your account. Once you enter your details, Apple will guide you through the next verification steps.
The waiting period that follows is an intentional security measure. It’s Apple’s way of making sure the recovery request is legitimate and not a fraudulent attempt to hijack your account. It’s absolutely crucial that you avoid using any devices still logged into your Apple ID during this time, as this can cancel the recovery and you’ll have to start all over again.
Pro Tip: Keep the browser tab open or bookmark the recovery status page. Apple provides updates there, so you won’t be left wondering about the progress. Trust me, this simple action can reduce a lot of the anxiety that comes with waiting.
Here in Nigeria, this process can sometimes take a bit longer. Based on what many users have shared, the waiting period can be anywhere from 24 hours to over a month because of Apple’s strict security checks. You can get more real-world insights about Apple ID recovery wait times on Apple’s community forums.
While you wait, it might be a good time to think about managing your digital footprint. Once you’re back in, our guide on how to delete data from an app on an iPhone can help you clean up and secure your device.
Right, so you’ve just been through the headache of getting your Apple ID password back. You definitely don’t want to go through that again. Let’s make sure it never happens by setting up a few digital safety nets. Think of it as creating a spare key for your digital life so you’re never left out in the cold.
Apple gives you a couple of really powerful tools for this: Account Recovery Contacts and a Recovery Key. These aren’t just about passwords; they’re about giving you, and only you, ultimate control over your account.
Set Up an Account Recovery Contact
This is probably one of the smartest and simplest things you can do. An Account Recovery Contact is someone you trust—a close friend or family member—who can help you get back into your account.
Don’t worry, they can’t snoop on your data. All they can do is generate a special code on their own Apple device and send it to you when you’re stuck.
Actionable step-by-step guide to set it up:
- Go to Settings > [Your Name] > Sign-In & Security.
- Tap on Account Recovery.
- Tap Add Recovery Contact and follow the on-screen instructions to invite someone from your contacts.
This is a fantastic security measure, especially for Apple users in Nigeria. With digital literacy rates varying—some data suggests only about 35% of smartphone users are fully comfortable with security settings—many people don’t even know this feature exists. Nigeria’s strong community and family ties make this a perfect fit. Just ask a trusted sibling or parent to be your contact. You can get the full rundown on setting this up on Apple’s support page.
Generate a Recovery Key
If you want to take your security up another notch, create a Recovery Key. Apple will generate a unique, 28-character code that puts the power to reset your password directly in your hands.
How to create your Recovery Key:
- Go to Settings > [Your Name] > Sign-In & Security.
- Tap on Account Recovery.
- Tap Recovery Key, turn it on, and follow the prompts to write down and confirm your key.
Think of the Recovery Key as the master key to your digital safe. It’s incredibly powerful, but it also comes with great responsibility. If you lose this key and also lose access to your trusted devices, you could be permanently locked out.
To really understand why this is such a strong defence, it helps to know how two-factor authentication works.
Make sure you store your Recovery Key somewhere safe and, crucially, offline. Writing it down and putting it in a secure drawer is a good idea. Just don’t save it as a note on the very iPhone it’s supposed to protect! Good security habits are essential, and for more tips on keeping your device tidy, have a look at our guide on How to Clear Data from App on iPhone: Free Up Storage Quickly.
Common Questions About Apple ID Password Recovery
Even with a perfect guide, you’re bound to run into a few tricky spots when trying to recover an Apple ID password. It can be a frustrating process, so let’s walk through some of the most common questions I hear and get you some clear, straightforward answers.
One of the most frequent panic-inducing moments is when you realise you’ve forgotten the Apple ID email itself, not just the password. If that’s you, your first port of call should be Apple’s own lookup tool. Before you even do that, though, just check your devices—your Apple ID is usually displayed right inside the App Store or Settings app.
What If I Forgot My Apple ID Email Address?
Misplacing your Apple ID email feels like a dead end, but it usually isn’t. More often than not, you can find it logged in on a device you already own.
Here’s an actionable checklist to find it:
- On your iPhone or iPad: Open Settings. Your Apple ID email is displayed directly under your name at the top.
- On a Mac: Open System Settings (or System Preferences). Your Apple ID email is shown under your name in the sidebar.
- In the App Store: Open the App Store, tap your profile picture, and your Apple ID should be visible.
- Check other email inboxes: Search your personal email accounts for receipts or messages from “Apple” or “iTunes”. The address they sent it to is likely your Apple ID.
If you’ve checked everywhere and still come up empty, Apple has a dedicated page where you can look it up using your name and another email you might have on file.
Will Apple Support Reset My Password for Me?
This is a big one: for your own protection, Apple Support staff cannot reset your password for you. Whether you’re on the phone or in a chat, they can’t do it.
They are there to guide you through the official steps on your device or the web, but they will never ask for your password or reset it on your behalf. Think of it as a crucial security layer that ensures only you can get back into your account.
The whole system is built on the idea that you, the owner, must be the one to complete the final verification. This is what stops someone from trying to social engineer their way into your account and getting at your personal data.
Knowing these little details can take a lot of the stress out of the recovery process. In the same way, being able to communicate your needs clearly is a valuable skill in almost any situation. You can learn more about how to improve writing skills with our handy guide.
Losing access for good is a genuine risk, which is why setting up recovery options ahead of time is so critical. If you’re permanently locked out, you lose everything tied to that account—all your app purchases, iCloud photos, messages, and subscriptions.
You can also check these articles:
- How to Import SIM Contacts to iPhone: A Step-by-Step Guide
- How to Screen Record on iPhone 8 Plus: A Quick Capture Guide
- How to Record on Your iPhone Screen and Audio
- How to Activate Screen Record on iPhone
Ready to create compelling content and manage your digital tasks with ease? RichlyAI offers a powerful suite of AI tools to help you write, code, and automate your workflow. Explore what you can create by visiting RichlyAI and start for free.