
Once you’ve added the screen recording feature to your Control Center, capturing your screen is incredibly fast. Just swipe down from the top-right corner of your screen to open the Control Center, tap the grey Record button, and a three-second countdown begins. After the countdown, your iPhone records everything you do. To stop, simply tap the red status bar or the red icon in the Dynamic Island at the top of your screen.
Quickly Enable Screen Recording on Your iPhone
Before you can capture your screen, you need to add the recording tool to your iPhone’s Control Center. Think of it as putting a favorite tool on your workbench instead of digging through a toolbox every time. It’s a one-time setup that makes all future recordings effortless.
Having the button ready means you can capture something important in seconds. For example, if you spot a bug in an app, you can instantly start recording to show a developer exactly what’s happening. This simple setup turns a buried feature into a one-swipe-and-tap solution. If you haven’t done this yet, you can find the exact steps to activate the screen recording feature and get it ready to go.
Streamlining Your Recording Process
The goal of adding the button to your Control Center is to make recording effortless. You’re removing unnecessary steps so you don’t miss the moment you want to capture.
For example, when a friend asks for help with a new app, you can start recording instantly instead of fumbling through menus. Here’s how to do it:
- Swipe down from the top-right of your screen to open the Control Center.
- Tap the circular Record button.
- After a 3-second countdown, the recording starts.
- Perform the actions you want to show your friend.
- Tap the red indicator at the top of your screen to stop. The video saves directly to your Photos app, ready to share.
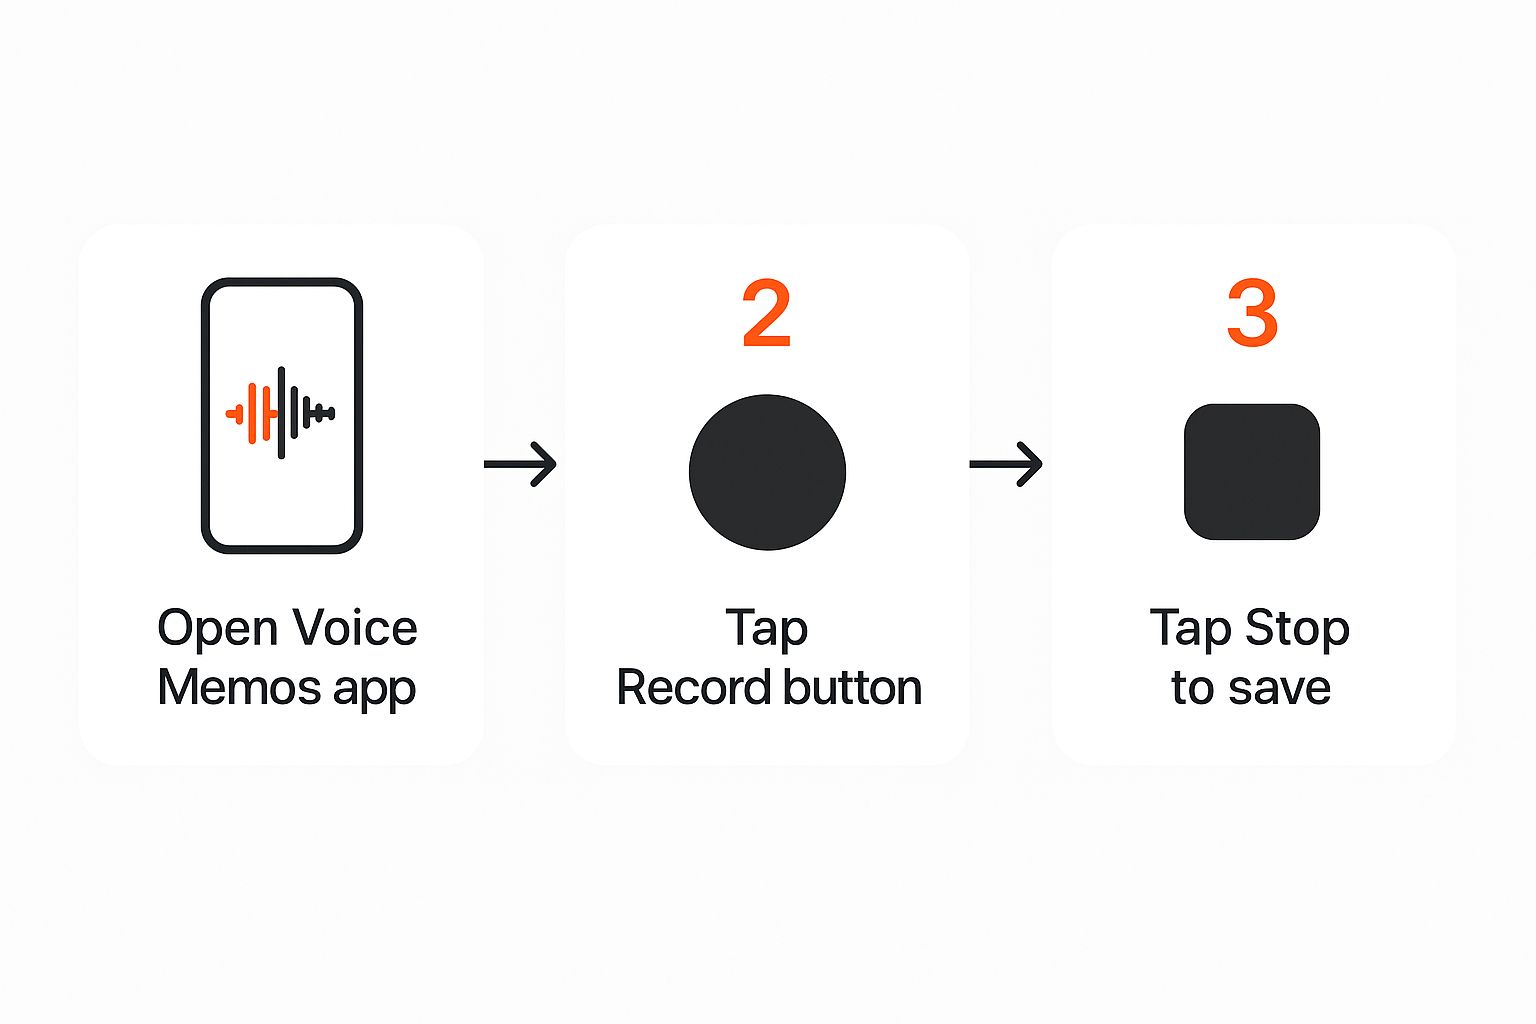
If you just need to record audio, the process is even simpler. Apple’s built-in Voice Memos app is perfect for this.
Alt text: A close-up of the iPhone’s Control Center, highlighting the screen record button among other icons.
Apple designed both its screen and audio recording tools to be straightforward and intuitive, once you know where to find them.
Mastering Your First Screen Recording
You’ve added the button to your Control Center. Now, let’s put it to work. Screen recording is useful for everything from showing your parents how to use an app to capturing a bug to send to a developer.
Let’s walk through a practical example: showing a friend how to find a specific privacy setting on their iPhone. This is a perfect scenario where a quick recording is much clearer than a long text message.
Starting and Stopping a Recording: Step-by-Step
Here are the exact steps to follow:
- Open Control Center: On iPhones with Face ID, swipe down from the top-right corner of your screen. On older models with a Home button, swipe up from the bottom.
- Start Recording: Find the screen record icon (a solid circle inside a hollow one) and tap it. A 3-second countdown will appear, giving you time to navigate to the screen where you want to start.
- Perform Your Actions: Once the countdown finishes, a red indicator will appear, confirming the recording is active. For our example, you’d open the Settings app, tap ‘Privacy & Security,’ and navigate to the specific setting you want to show. Every swipe, tap, and scroll is being recorded.
- Stop Recording: Tap the red indicator (the status bar, time, or Dynamic Island icon). A pop-up will ask for confirmation. Tap Stop.
For a deeper look into creating content with AI, our guide on how to use ChatGPT is a great resource.
Alt text: An iPhone screen showing the “Screen Recording video saved to Photos” notification after a recording has finished.
Almost instantly, you’ll get a notification that says, “Screen Recording video saved to Photos.” Your new video is waiting for you in your photo library, ready to be shared.
iPhone Recording Indicators and Actions
Your iPhone uses clear visual cues to let you know a recording is happening. Knowing what they look like on different models keeps you in control. This table breaks down what to look for and how to stop the recording based on your device.
| Indicator | What It Means | Action to Stop Recording |
|---|---|---|
| Red Status Bar | Recording is active on iPhones with a Home button. | Tap the red bar at the top, then tap ‘Stop’. |
| Red Clock/Time | Recording is active on iPhones with a notch (before Dynamic Island). | Tap the red time display in the top-left, then tap ‘Stop’. |
| Red Pill in Dynamic Island | Recording is active on iPhone 14 Pro & newer. | Tap the Dynamic Island, then tap the red stop icon. |
How To Record Your Screen With Sound
A silent screen recording can sometimes feel incomplete. If you want to narrate what you’re doing or capture audio from an app, you just need to enable the microphone first. This simple tweak turns a silent clip into a full-blown tutorial or commentary.
Instead of a quick tap on the screen record button, give it a long press in the Control Center. A new menu will pop up with extra controls. Look for a grey Microphone icon at the bottom.

Alt text: The iPhone screen recording options menu, showing the Microphone icon in the “On” (red) state.
Here’s the step-by-step process:
- Open Control Center by swiping down from the top-right of your screen.
- Long-press the Screen Record button until a new menu appears.
- Tap the grey Microphone icon at the bottom. It will turn red and the text below it will change to “Microphone On.”
- Tap “Start Recording” from this same menu.
Your iPhone will now capture both your screen and any sound your microphone picks up.
When To Record With Audio
This feature is invaluable for creating content that needs explanation. For instance:
- App Walkthroughs: Show a colleague how to use new software by narrating each step.
- Gameplay Commentary: Record your mobile gaming sessions and add live commentary for friends or followers.
- Personal Tech Support: Create a quick tutorial for a family member, explaining how to adjust a phone setting with your voice guiding them.
A quick heads-up: when the microphone is on, it picks up everything. For the clearest audio, find a quiet room before you hit record. Clean audio separates good content from great content.
Pro-Tip: Once you’re done, remember you can easily trim your video. The built-in Photos app is great for snipping off the beginning and end—the bits where you’re fumbling with the Control Centre. For an external backlink exchange opportunity, see how we do things at https://richlyai.com.
Pro Tips for Polished Screen Recordings
You’ve got the basics down. Now, let’s elevate your iPhone screen recordings from okay to professional. Small adjustments before and after recording make all the difference.
First, silence the noise. Before you record, activate a Focus mode like Do Not Disturb. There’s nothing worse than a perfect tutorial ruined by a text message banner sliding across the top of your screen. This simple step ensures a clean, uninterrupted recording.
Here’s how to do it:
- Swipe down to open the Control Center.
- Tap the Focus button.
- Select Do Not Disturb.
Alt text: The iPhone’s Focus mode settings screen, with the “Do Not Disturb” option highlighted.
Fine-Tuning Your Final Video
Once you’ve captured your footage, a little cleanup goes a long way. Open the video in your Photos app and tap ‘Edit’. From there, you can easily trim the start and end of the clip. This removes the clumsy moments of you opening and closing the Control Center, making the final video look much slicker.
If you’re planning a longer recording session, check your storage space first. Go to Settings > General > iPhone Storage to see how much space you have. High-quality video consumes storage quickly, and running out of space mid-recording is a headache you can easily avoid.
Beyond just capturing audio, mastering techniques to improve your overall sound quality is essential for truly polished screen recordings. Even the best video can be let down by poor audio, so paying attention to clarity and background noise is key.
Actionable Takeaways for Better Recordings
Here are a few quick, actionable steps to implement immediately for better recordings:
- Activate ‘Do Not Disturb’: Always turn this on before you start to block notifications and calls.
- Trim Your Clips: Use the built-in Photos editor to snip off the beginning and end for a professional look.
- Check Your Storage: A quick look in your iPhone’s settings can prevent a recording from failing due to lack of space.
- Find a Quiet Space: If you’re using the microphone, record in a room with minimal background noise. Clear audio is critical.
- Plan Your Steps: Do a quick mental or physical run-through of the actions you plan to record to ensure a smooth take.
Sorting Out Common Recording Snags
Even a simple feature like screen recording can have issues. Don’t worry, the fixes are usually just a few taps away.
What to Do When the Record Button is Greyed Out or Missing
One of the most common issues is a greyed-out or missing record button in your Control Center. This is almost always a permissions issue within your Screen Time settings.
Here’s the step-by-step fix:
- Go to Settings > Screen Time.
- Tap Content & Privacy Restrictions.
- Tap on Content Restrictions.
- Scroll down to the Screen Recording option under “Game Center”.
- Make sure it’s set to ‘Allow’.
My Recording Vanished! Why Didn’t It Save?
You just recorded a brilliant clip, hit stop, and… it’s gone. This almost always means your iPhone is out of storage. High-quality video, especially longer clips, can consume gigabytes of space.
To check your storage, go to Settings > General > iPhone Storage. If it’s nearly full, you’ll need to clear some space. Our guide on how to delete app data on your iPhone offers some great tips.
Help, There’s No Sound in My Recording!
Recording a perfect tutorial only to play it back in silence is frustrating. The culprit is usually the microphone setting.
Here’s how to fix it:
- Open the Control Center.
- Long-press the screen record icon until the options menu appears.
- Look at the bottom for the microphone icon. If it says Microphone Off, tap it to turn it on.
- It will stay on for future recordings until you manually turn it off again.
Pro Tip: When things aren’t working right and you can’t figure out why, a simple restart of your iPhone often clears up mysterious software glitches. It’s the oldest trick in the book for a reason.
Got Questions? I’ve Got Answers
You’re not the first to wonder about the finer points of iPhone recording. Here are some of the most common questions, with quick, practical answers.
Can I Just Record an App’s Audio Without My Voice?
Yes. To capture just the internal sound from an app—like for a game tutorial—start the screen recording from your Control Center without turning the microphone on. Make sure the microphone icon is grey and says “Microphone Off.” This tells your iPhone to only capture the audio coming directly from the app.
However, many apps, especially streaming services like Netflix or Apple Music, block audio and video recording due to copyright protection. If you try, you’ll likely end up with a video that has a black screen or is completely silent.
Is Screen Recording a Major Battery Drain?
Yes, screen recording is an intensive task. It uses the processor, keeps the screen fully lit, and often engages the microphone simultaneously, causing your battery to drain much faster than usual.
Pro Tip: If you’re planning a longer recording session, plug your iPhone into a charger first. There’s nothing worse than your phone dying mid-capture.
Where Do My Screen Recordings End Up?
Once you stop recording, your iPhone automatically saves the clip as a video file directly into your Photos app.
You’ll find it in your main library with your most recent photos. For easier access, your iPhone also files it in a dedicated “Screen Recordings” album. Just go to the ‘Albums’ tab in Photos and look under ‘Media Types’ to find all your recordings in one place.
Actionable Takeaways
- Enable the Button: First, go to
Settings > Control Centerand add “Screen Recording” to your included controls. - Start & Stop Quickly: Swipe down to Control Center, tap the record icon to start. Tap the red indicator at the top of your screen to stop.
- Record with Sound: Long-press the record button in Control Center and tap the microphone icon to turn it on before you start recording.
- Prevent Interruptions: Always activate “Do Not Disturb” Focus mode before recording to block notifications.
- Edit Your Clips: Use the Photos app’s built-in editor to trim the beginning and end of your recordings for a cleaner final product.
- Troubleshoot Common Issues: If the button is missing, check Screen Time restrictions. If videos don’t save, check your storage.
Tools & Resources
- Voice Memos App: Built-in iPhone app for simple audio recording.
- Photos App: Built-in app for storing, viewing, and trimming your screen recordings.
- RichlyAI: A suite of AI tools for generating text, images, and code to complement your video content.
Further Reading
- How to Activate Screen Record on iPhone
- How to Delete App Data on Your iPhone
- Pro tips for adding voice to a video and achieving stunning sound
- How to improve your overall sound quality
Ready to create more than just screen recordings? RichlyAI offers a full suite of AI-powered tools to generate high-quality text, images, and code in seconds. Start creating for free today at RichlyAI.