
Every great dragon drawing, no matter how intricate, starts with a few simple shapes. This approach gives you a solid framework to build upon, ensuring your beast has believable proportions right from the get-go. Instead of staring at a blank page, you’ll start by doodling circles and ovals to build a foundation.
This guide will walk you through the entire process, from gathering your tools to adding the final details, with actionable steps and examples you can follow.
Step 1: Gather Your Tools and Sketch the Basic Shapes
Before you bring your mythical creature to life, let’s make sure you have the right gear. You don’t need a professional art studio; a few reliable tools will make the process smoother and more enjoyable.
Your Dragon Drawing Toolkit
Here are the essential supplies to start sketching your dragon with confidence.
| Tool | What It’s For | Beginner Recommendation |
|---|---|---|
| Pencils | Sketching, lining, and shading | Start with a standard HB pencil for light initial sketches and a 2B or 4B for darker, more defined lines. |
| Paper | Your canvas | A sketchbook with mixed media or drawing paper has a slight texture (tooth) that grabs graphite well. |
| Eraser | Correcting mistakes and lifting highlights | A kneaded eraser is ideal. You can shape it to a fine point for precise erasing, and it won’t smudge your work. |
With these basics, you’re ready to tackle your drawing.
The Foundation of Form: Basic Shapes
Complex subjects are just collections of simple forms. To draw a dragon, first see it as a series of connected circles, ovals, and cylinders. This professional technique helps establish a dynamic pose and balanced proportions before any detail is added.
This is what that early process looks like.
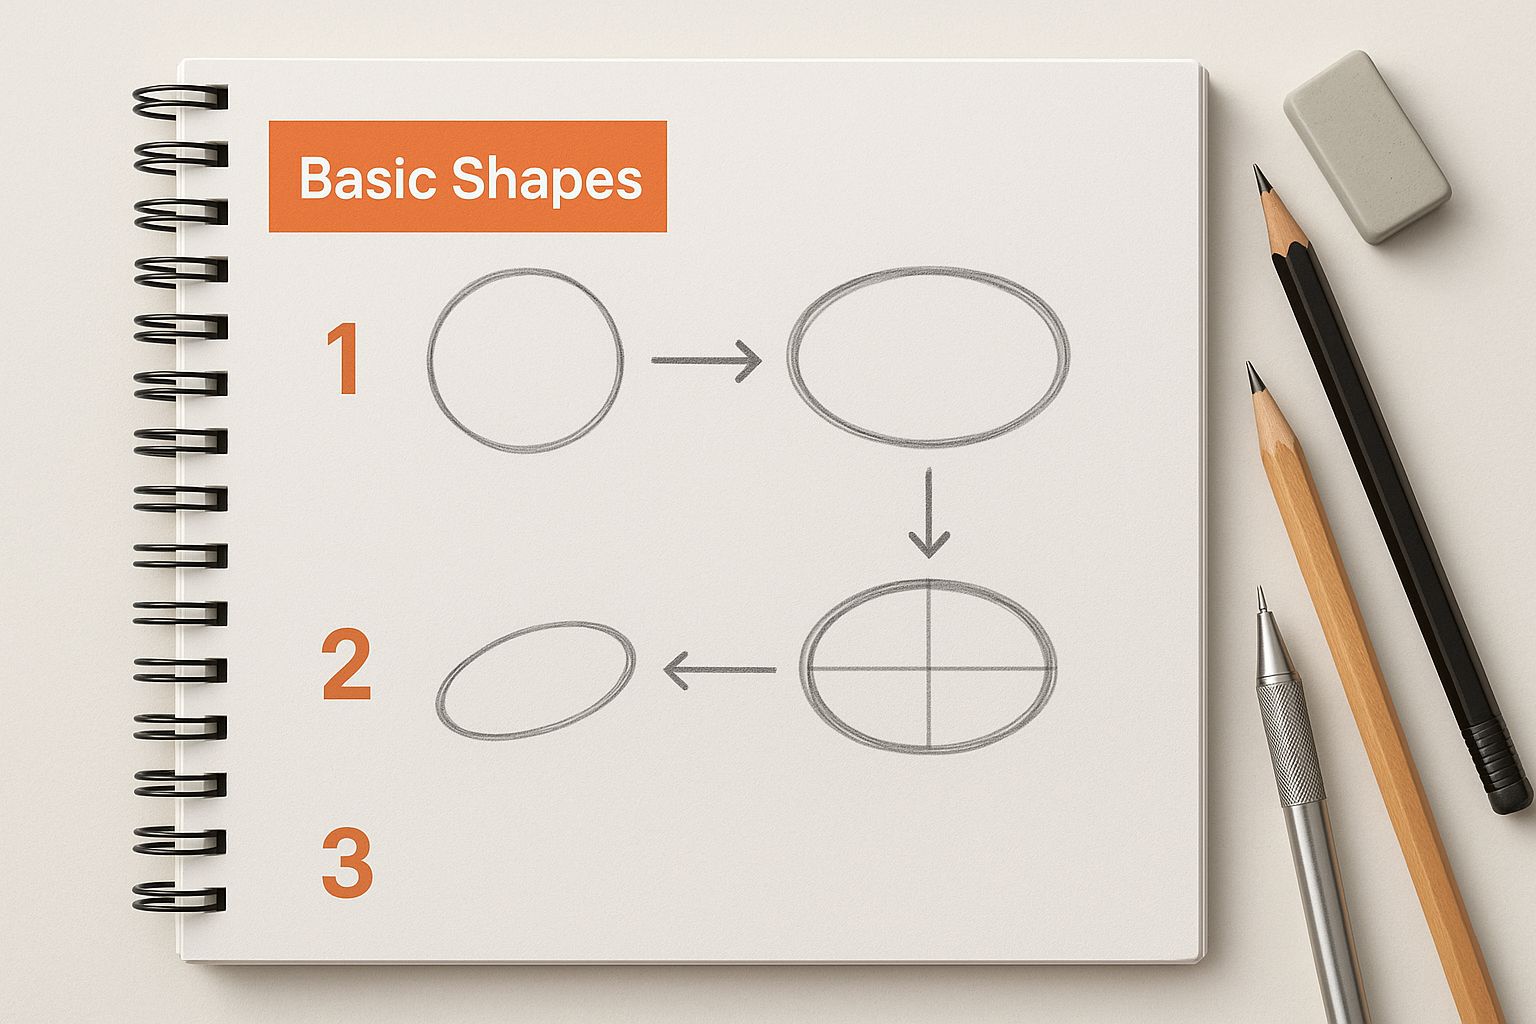
alt text: An open sketchbook on a desk shows a dragon being constructed from simple circles and ovals, with pencils scattered nearby, illustrating the initial blocking-in phase of drawing.
Think of it as building a skeleton for your drawing. Once this underlying structure is solid, adding muscles, scales, and horns becomes much more natural.
Actionable Task: Building Your Dragon’s Core
Let’s put this into practice with a step-by-step example.
- Draw the Chest: With your HB pencil, lightly sketch a large oval for the chest cavity. This is the largest mass of the dragon’s body.
- Draw the Pelvis: Sketch a slightly smaller oval for the pelvis area, leaving space between it and the chest.
- Connect with the Spine: Connect the tops of the two ovals with a swooping line to form the spine. Connect the bottoms with another curved line to create the belly.
- Add the Head: Draw a simple circle for the head, connected to a tapered rectangle for the snout.
You have now established the core mass and posture of your dragon. Keep these initial lines light and loose; they are guides, not final lines. This block-in method is a universal skill. You can apply the same principle to draw almost anything, as seen in our guide on how to draw a snail, where the creature is built from simple spirals and ovals.
Step 2: Create a Dynamic Pose with a Gesture Skeleton
With the basic shapes understood, let’s bring your dragon to life. To avoid a stiff, lifeless drawing, you need to create a gesture skeleton—a fluid framework that captures the dragon’s movement and energy before you add details.
This starts with a single, powerful stroke: the line of action.
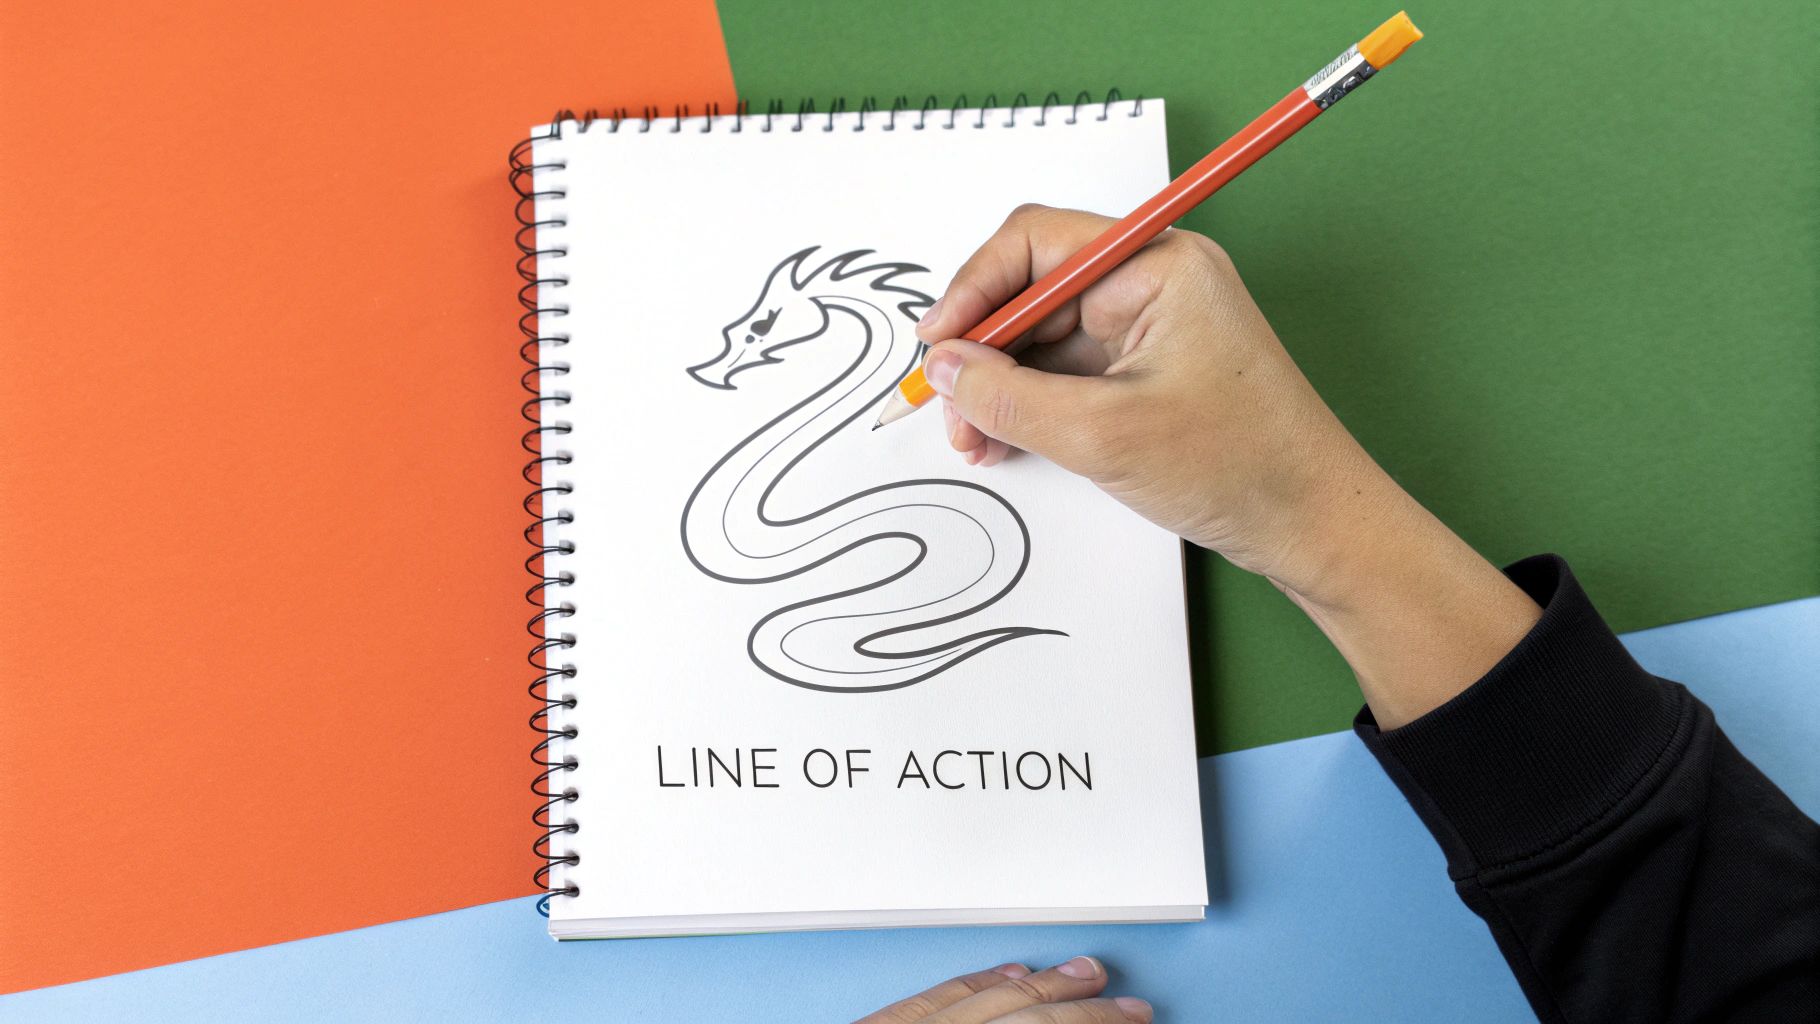
alt text: A sketch showing several curved lines of action, with simple dragon forms built around them to demonstrate how to create dynamic poses.
Think of this line as your dragon’s spine. It’s a single, flowing curve that dictates the creature’s entire rhythm. For a soaring dragon, this will be a gentle ‘S’ curve. For a dragon coiled around treasure, it will be a tight spiral. This one line is critical for making a drawing feel dynamic.
Mapping Out the Main Body Forms
With your line of action established, you can block in the main parts of the body along its path. Here’s a simple, step-by-step process:
- Draw the Line of Action: Start with a single, energetic curve across your page. This defines the overall pose.
- Place the Ribcage: Draw a large oval near the center of your line of action. This represents the chest, the heaviest part of the dragon.
- Place the Pelvis: Further down the line, place a smaller oval for the hips. The space between the ribcage and pelvis defines the torso length.
- Place the Head: At the top of your line, sketch a circle for the cranium. This anchors the snout, jaw, and horns you’ll add later.
These three simple forms, held together by one fluid line, create a strong, balanced foundation. You’ve established your dragon’s weight, posture, and direction without drawing a single limb.
Practical Example: A Soaring Dragon Pose
Let’s apply this. To draw a dragon in flight, follow these steps:
- Draw the Action Line: Start with a long, gentle ‘S’ curve across your paper.
- Block in the Body: Place the large oval for the ribcage near the top of the curve, then add the smaller pelvic oval further down. Connect them with lines that follow the main curve to form the torso.
- Add Neck and Tail: Extend lines for the neck and tail, flowing out from the ribcage and pelvis and continuing along the path of your action line.
- Sketch the Limbs: Sketch simple stick lines for the limbs and wings. The front legs can be tucked under the body, while the back legs trail behind. For the wings, draw big, arching shapes to convey the power of flight.
If you need inspiration for dynamic poses, an AI image generator for free can help you explore different concepts before you start sketching.
Step 3: Add Anatomical Structure (Muscle and Bone)
Now that you have a gesture sketch, it’s time to add muscle and bone. This stage transforms your simple lines and circles into a creature with real weight and power. The best way to create a believable dragon is to borrow anatomy from real-world animals.
Building Powerful Limbs
A dragon is massive, so its legs must look strong enough to support its bulk. Monitor lizards and crocodiles are excellent references for this.
Follow these steps to build a powerful, lizard-inspired leg:
- Define the Shoulder: Over the simple line you drew for a front leg, draw a large, rounded teardrop shape for the shoulder and bicep muscles.
- Add the Forearm: Attach a smaller, blockier shape for the forearm. Add a sharp point for the elbow to add realism.
- Draw the Foot: Finish with a wide, flat shape for the foot, then add sharp, curved triangles for claws.
This process turns a simple line into a limb with tangible muscle and bone.
Crafting a Head Full of Character
The head is the center of your dragon’s personality. Is it an ancient, wise being or a feral beast? The shapes you choose will tell its story. A long, slender snout with elegant horns suggests wisdom, while a short, broad jaw and thick, jagged horns convey aggression.
Don’t be afraid to mix and match elements to create something unique.
Actionable Tip: To make your dragon stand out, add unique details. Try frills like a frilled-neck lizard, spines along the jaw, or creative horns. Horns could be curved like a ram’s, straight like an antelope’s, or branched like antlers. These details define your dragon’s silhouette and make it memorable.
Dragons have been imagined in countless ways across cultures. In East Asia, for example, dragons are potent symbols of power, with a rich history spanning millennia. You can explore the cultural evolution of the Chinese dragon on Wikipedia for inspiration.
Designing Functional Wings
For wings to look believable, they need a logical structure. The classic bat-wing design is popular because its anatomy is functional and visually impressive.
Here’s how to construct a bat-like wing:
- Anchor the Wing: Start with a strong shoulder joint on the dragon’s back.
- Draw the Bone Structure: Sketch the arm bones: an upper arm, an elbow, and a forearm.
- Add the “Fingers”: From the wrist area, fan out three to five long, spindly finger bones.
- Create the Membrane: Connect the tips of these fingers back to the dragon’s body with long, sweeping curves to form the wing membrane.
If you’re ever stuck for ideas on creature design, artificial intelligence drawing tools can generate unique anatomical concepts to spark your creativity.
Step 4: Add Scales, Horns, and Defining Details
Your dragon has a solid structure, but now it’s time for the magic. This stage is about adding personality through texture, scales, horns, and other details that transform your drawing into an unforgettable character.
The idea of drawing hundreds of scales can be daunting, but there’s a simpler way.
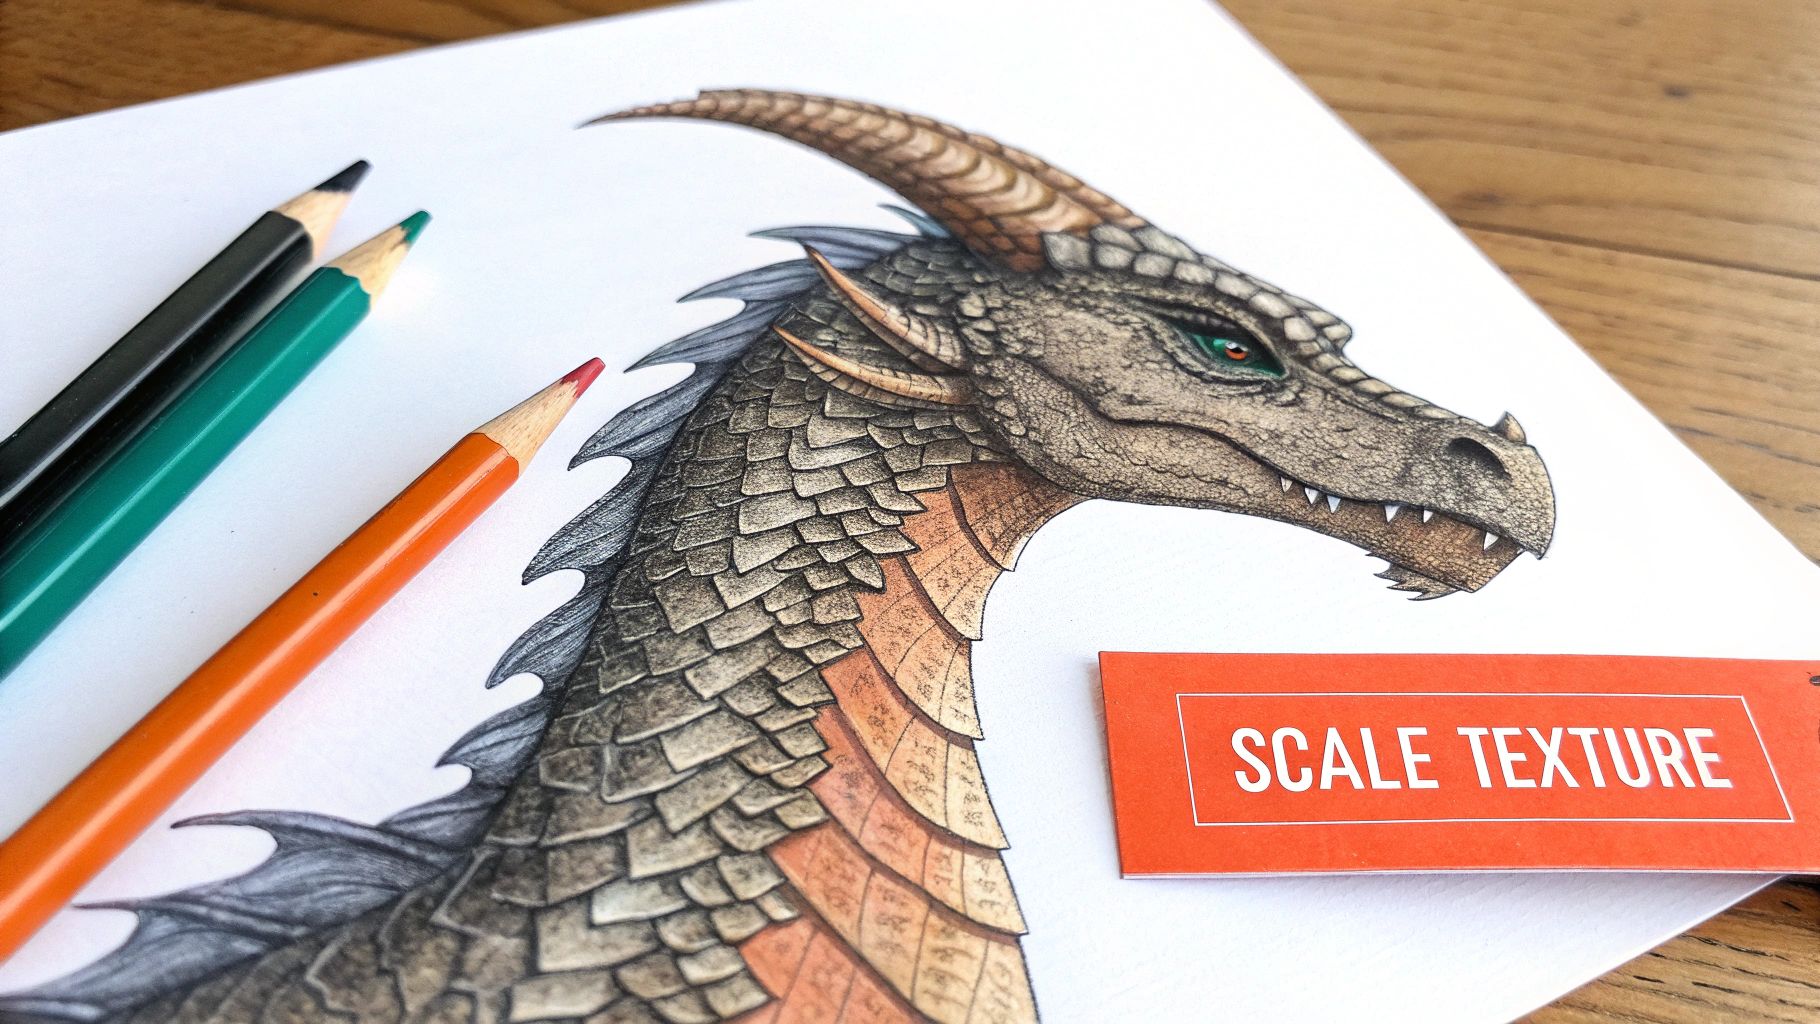
alt text: A detailed close-up illustration of a dragon’s head, showcasing intricate scales, horns, and expressive eyes as an example of adding fine details.
A Smarter Way to Draw Scales
Instead of drawing every scale, create the illusion of a fully scaled beast.
Follow this technique:
- Create a Contour Grid: Lightly sketch a grid of crisscrossing lines over the dragon’s body. Make sure these lines wrap around the form of the muscles and limbs, like contour lines on a map. This immediately gives the body a three-dimensional feel.
- Detail Key Areas: Instead of filling in every diamond in the grid, focus on fully rendering a few key clusters of scales. Choose spots that draw the eye, like the curve of a shoulder, the ridge along the spine, or the side of the jaw.
- Vary Scale Size: Use large, thick, armor-like plates along the back and smaller, finer scales on flexible areas like the underbelly or around joints. This adds realism and helps explain the dragon’s movement.
This technique suggests texture across the entire body without tedious, repetitive work.
Crafting Expressive Features
The head is the focal point, and its horns, eyes, and teeth cement its personality.
- Horns: Think about their history. Are they long and elegant, suggesting an ancient creature? Or are they thick and gnarled, hinting at a life of battle? A small chip or scar tells a story.
- Eyes: The pupil shape conveys personality. A slitted, reptilian pupil often reads as cunning or predatory. A round pupil can make a dragon appear more intelligent or curious.
- Teeth: Avoid uniform spikes. Vary their size and shape, adding smaller teeth between larger fangs for a more natural, menacing grin.
For more inspiration, look at different cultural interpretations. For example, the rich history of dragon symbolism in Vietnam shows a fascinating blend of mythologies that can spark fresh ideas. If you’re stuck visualizing a unique feature, you can use AI tools to generate concepts. Our guide on turning an image to prompt shows you how to use visual references to get better results.
Step 5: Bring Your Dragon to Life with Shading and Color
Your dragon is drawn, but it’s still a flat outline. Shading is what gives it weight, form, and presence. The entire process starts with one question: where is the light coming from? Decide on your light source first—whether it’s the sun from above or a magical glow from below—as this dictates where every shadow and highlight goes.
https://www.youtube.com/embed/Fu40La3EUcE
Mastering Shading Techniques
Once you know your light source, you can sculpt your dragon’s body with shadow. Three core techniques will cover most of your needs:
- Hatching: Drawing parallel lines. The closer the lines, the darker the shadow. This is great for showing the curve of a muscle.
- Cross-Hatching: Hatching in two or more directions. This is a quick way to build up dark, intense shadows in areas like the crevices between scales.
- Blending/Smudging: Using a blending stump, cotton bud, or your finger to smudge graphite for a softer look. This works well for the smoother skin of the underbelly or for rounded horns.
Avoid making shadows flat black. Remember that light bounces off other surfaces (reflected light), which can subtly illuminate parts of a shadow and make your dragon feel truly three-dimensional.
Choosing a Color Palette
If you’re working with color, your choices can define your dragon’s personality. Fiery reds and oranges suggest an aggressive, fire-breathing beast. Cool blues and greens might imply a wise sea serpent.
The symbolic meaning of color is powerful. In Southeast Asia, for instance, dragon imagery was a cornerstone of commerce, and jars adorned with dragons were major status symbols. You can explore the cultural and economic value of dragon motifs in the region to see how color and design were used historically.
Digital tools offer immense control. In programs like Photoshop, you can layer colors and experiment with lighting effects. If you’re new to digital painting, our guide on how to use Photoshop to edit pictures can help you understand the basics of layers and blending, taking your shaded dragon to the next level.
Common Problems and How to Fix Them
Even experienced artists hit roadblocks. Here are solutions to common challenges you might face when drawing a dragon.
How do I make my dragon look unique?
The key to a unique dragon is to tell a story with its design. Before you draw, ask yourself:
- Where does it live? A swamp-dweller might have smooth, amphibian-like skin. A mountain dragon might have fur-like plating for warmth.
- What is its personality? A battle-hardened dragon could have a scarred snout and a chipped horn. An ancient wyrm might have long, flowing whiskers.
Basing design choices on a backstory automatically creates a more memorable creature. Mash up features from different real-world animals like rams, pangolins, or lions for fresh ideas.
Why do my dragon poses look so stiff?
This almost always happens when you jump to details before establishing movement. The fix is to always start with a line of action. This single, flowing line captures the pose’s energy. Build your simple shapes (ribcage, pelvis, head) along this line to ensure the entire body follows a natural, dynamic flow from the start.
How many fingers and toes should a dragon have?
There’s no single rule, but consistency is key to making your dragon believable.
- For Wings: A bat’s wing is a great reference. They typically have a small thumb-claw at the wrist, followed by three to four long finger bones supporting the wing membrane.
- For Feet: Three or four toes plus a dewclaw (a small claw set higher up the leg) creates a powerful, predatory look, similar to a T-Rex or a large eagle.
Whatever number you choose, stick with it for all limbs to maintain consistent anatomy.
Actionable Takeaways
- Start with Shapes: Begin every drawing by breaking the dragon down into simple circles and ovals. This establishes proportion and form early.
- Use a Line of Action: Always draw a single, flowing line first to define the pose and ensure your dragon looks dynamic, not stiff.
- Reference Real Animals: Ground your fantasy creature in reality by borrowing anatomy from lizards, bats, and other animals. This makes your design more believable.
- Suggest Detail, Don’t Draw It All: Use contour grids and focused rendering to create the illusion of scales without drawing every single one.
- Define Your Light Source: Before shading, decide where the light is coming from. This single decision guides all your shadows and highlights.
Tools and Resources
- Inspiration: Use an AI image generator for free to brainstorm poses and design concepts.
- Digital Painting: Learn the basics of digital color and shading with this guide on how to use Photoshop to edit pictures.
- Advanced AI Tools: For complex designs, explore artificial intelligence drawing tools.
Further Reading
- Cultural History: Cultural evolution of the Chinese dragon on Wikipedia
- Regional Symbolism: The Symbol of the Dragon in Vietnam and Japan
Ready to take your creative projects to the next level? The RichlyAI Hub offers a suite of powerful AI tools to help you generate stunning images, craft compelling text, and streamline your workflow. Start creating for free with RichlyAI today!