
Learning how to use Photoshop to edit pictures isn’t as scary as it looks. At its core, it’s about a few key actions: opening your photo, knowing your way around essential panels like Tools and Layers, and making your changes with non-destructive Adjustment Layers. Once you get this basic process down, you’ve built the foundation for turning any snapshot into a professional-looking image.
Getting Around the Photoshop Workspace
Jumping into Photoshop for the first time can feel a bit like stepping into an aeroplane cockpit—buttons and menus everywhere. But here’s the secret: you only need to know a handful of controls to get off the ground. The aim isn’t to memorise every single tool, but to build a workspace that feels comfortable and lets you edit efficiently.
The moment you open an image (just go to File > Open), your screen splits into three main areas. To your left, you’ll find the Tools Panel, which is exactly what it sounds like. It’s home to the icons you’ll click to do things, like the Move Tool, Crop Tool, and various brushes.
On the right side of your screen are your control panels. The two you’ll live in are the Layers Panel and the Adjustments Panel. This is where the real magic happens, allowing you to make powerful edits without permanently changing your original photo.
Your Core Photoshop Toolkit
To get you started, here’s a quick-reference guide to the fundamental tools you’ll be reaching for constantly. Think of these as the absolute essentials for your digital darkroom.
| Tool Name | What It Does | Best Used For |
|---|---|---|
| Move Tool (V) | Moves selections, layers, and guides. | Repositioning elements or text in your image. |
| Marquee Tool (M) | Makes rectangular, elliptical, or single-row selections. | Selecting a specific area to edit or copy. |
| Lasso Tool (L) | Creates freehand selections. | Outlining irregularly shaped objects. |
| Crop Tool (C) | Trims, straightens, and changes the aspect ratio of an image. | Improving composition and removing distractions. |
| Spot Healing Brush (J) | Quickly removes blemishes and small imperfections. | Basic retouching like removing dust spots or acne. |
| Brush Tool (B) | Paints brush strokes. | Masking, digital painting, or adding creative effects. |
| Clone Stamp Tool (S) | Paints with a sample of an image to duplicate areas. | Removing unwanted objects or filling in missing parts. |
Getting familiar with these core tools by name and shortcut key will dramatically speed up your workflow and make editing feel much more intuitive.
Set Up Your Workspace for A Smooth Workflow
Before you even think about making your first edit, take a minute to arrange these panels to fit how you work. You can click and drag any panel to move it around, dock it with others to save space, or close it if you never use it.
Actionable Step:
- Go to
Windowin the top menu. - Make sure
Layers,Adjustments, andPropertiesare all checked. These are your core panels. - Click and drag the tab of each panel to stack them neatly in the bottom-right corner of your screen. This creates a clean, efficient editing hub.
A well-organised workspace is the first step to an efficient editing process. When you customise the layout, you cut down on the clutter and keep your most-used tools just a click away. It lets you get into a creative flow instead of getting bogged down searching for functions.
This focus on a streamlined workflow has become even more accessible. The evolution of Adobe Photoshop mobile apps has significantly changed how many Nigerians approach picture editing. With powerful features like layering and object removal now on mobile, users can perform complex edits that were once exclusive to desktop software, right from their phones.
The beauty of Photoshop lies in its flexibility, whether you’re on a desktop or a phone. While the main application offers incredible depth, many creatives now use other tools to spark initial ideas. For example, it’s worth exploring how an AI image generator can create unique visuals that you can then bring into your Photoshop projects. Blending these different tools is a fantastic way to open up new creative possibilities.
Nailing the Essential Photo Adjustments
Alright, once you’ve found your way around the Photoshop layout, this is where the magic really happens. We’re about to take your photos from good to great, turning simple snapshots into polished, professional-looking images. The secret sauce here is working non-destructively—a fancy way of saying we’ll never permanently alter your original photo.
Your best friend for this entire process is the Adjustment Layer. Instead of applying edits directly to your image, you’ll stack new layers on top, each one controlling a specific change like brightness, colour, or contrast. This gives you incredible flexibility.
Getting Exposure and Contrast Just Right
Most photos straight out of the camera are either a little too dark or a touch too bright. Fixing this is your first priority. For this job, the Levels and Curves adjustment layers are your go-to tools.
Step-by-Step Guide: Using Levels for Better Exposure
Let’s say you have a portrait that feels a bit flat and underexposed.
- In the Adjustments Panel, click the Levels icon (it looks like a small histogram). This creates a new Levels adjustment layer.
- You’ll see a graph with three sliders beneath it.
- The Black Slider (Shadows): Drag this one slightly to the right, towards where the graph data begins. Watch how it deepens the darkest parts of the photo, adding rich contrast.
- The White Slider (Highlights): Pull this one slightly to the left, towards the start of the graph data on the right. This brightens the lightest areas, giving the image a clean pop.
- The Grey Slider (Midtones): This one tweaks the overall brightness. Slide it left to brighten or right to darken the image without affecting your pure blacks or whites.
Just a few small nudges of these sliders can bring a photo to life, giving you incredible control over its tonal range.
This quick visual guide breaks down how to apply these adjustments without damaging your original image.
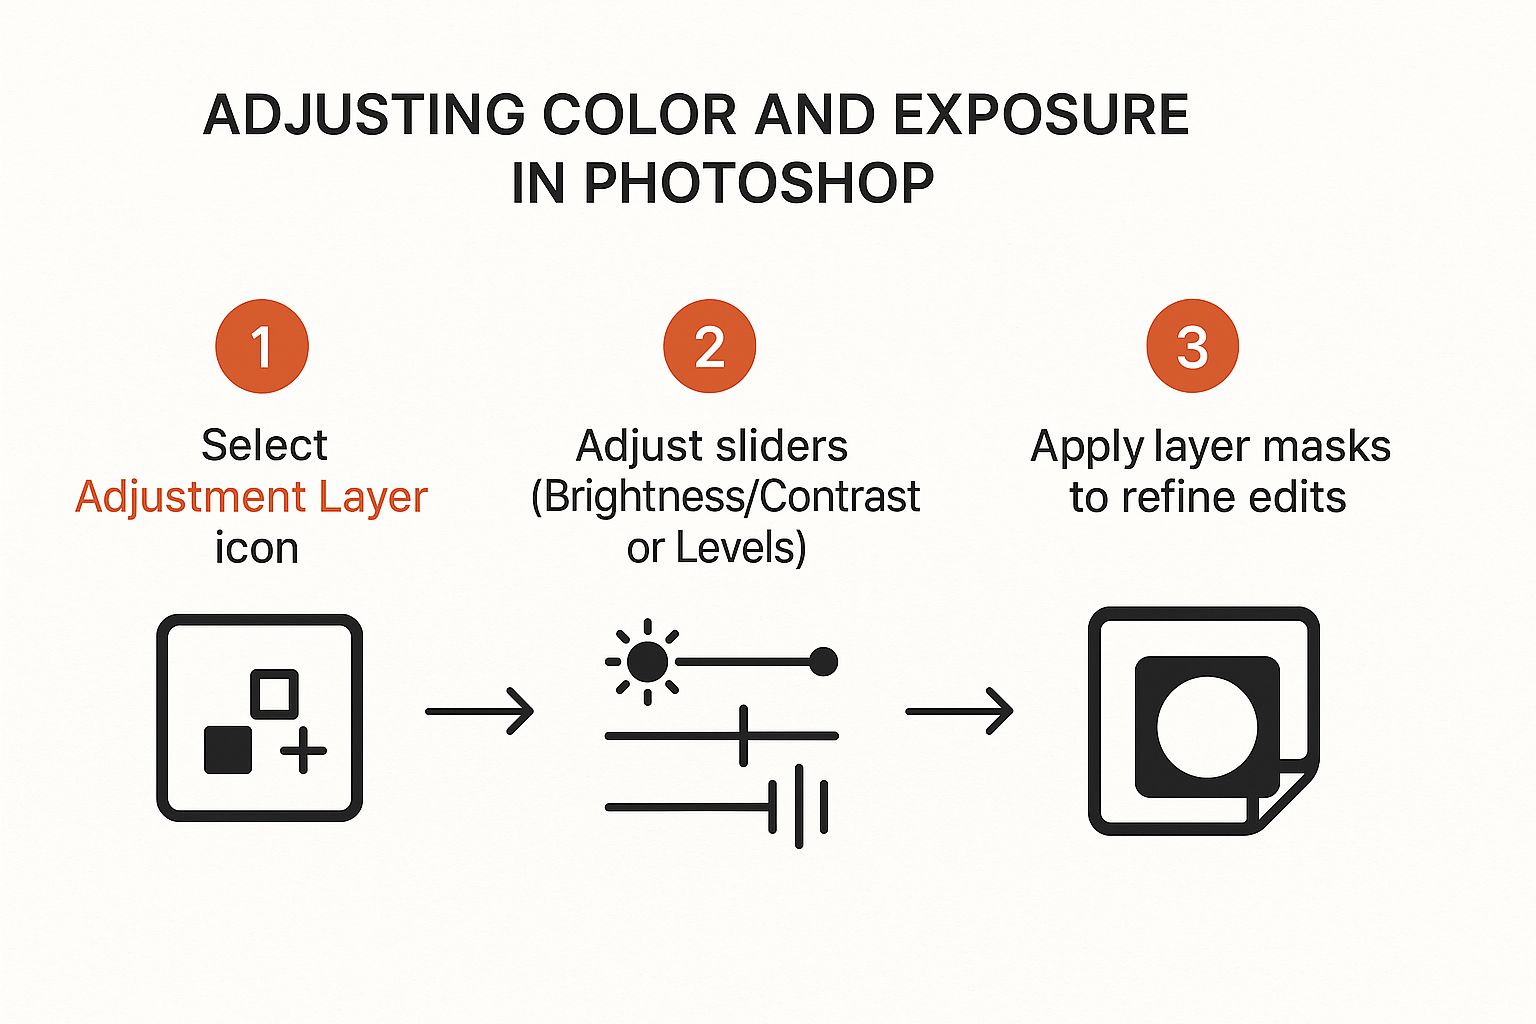
The real power move here is using layer masks—that white rectangle next to your adjustment layer. It lets you paint your edits onto specific parts of the image, giving you absolute, pixel-perfect control.
Breathing Life Into Colours and Fixing Tints
Ever take a photo where the colours just feel… off? Maybe there’s a weird yellow or blue tint, or the scene just looks a bit dull. That’s where colour adjustments save the day. For this, I almost always turn to the Hue/Saturation and Vibrance adjustment layers.
Step-by-Step Guide: Boosting Muted Colours
Imagine you’ve got a landscape shot, but the green in the trees looks a bit washed out.
- In the Adjustments Panel, click the Vibrance icon.
- In the Properties panel that appears, gently push the Vibrance slider to the right (e.g., to +20). This tool intelligently boosts the more muted colours while leaving already-saturated ones alone, preventing an unnatural look.
- If you need more overall punch, increase the Saturation slider slightly (e.g., to +5), but be careful not to overdo it.
If your photo has an odd colour cast—like that yellow glow from indoor lights—a Colour Balance adjustment layer is the perfect fix. You can neutralise the tint by adding a bit of its opposite colour. So, to fight a yellow tint, you’d add a little blue. It’s a simple trick that restores clean, accurate tones.
A key takeaway: The goal with these foundational edits isn’t to create a completely different photo. It’s to enhance what’s already there. Small, precise changes with Adjustment Layers will always look more professional than heavy-handed, one-click filters.
While Photoshop is a powerhouse for this kind of detailed work on a single image, many photographers use other tools for the initial heavy lifting. Tools like Adobe Lightroom Classic are incredibly popular for organising and making basic adjustments across hundreds of photos from a shoot before bringing the best ones into Photoshop for finishing touches.
This idea of using different tools for what they do best is becoming more common. For example, many creatives are now exploring how they can use AI to https://richlyai.com/blog/using-ai-to-design-your-brand-logo-cv-flyer-website-made-easy, then bringing those assets into Photoshop for final customisation.
Retouching Photos for a Flawless Finish
Once your colour and exposure are dialled in, it’s time to tackle the little things—the small distractions that can draw the eye away from what really matters in your shot. This is what we call retouching, and the name of the game is subtlety. You want the final image to look effortlessly perfect, not obviously edited.
This is where Photoshop really flexes its muscles. Its tools let you dive right in and manipulate the actual pixels, giving you the power to remove unwanted objects or smooth out skin with unbelievable precision.
Cleaning Up with Healing and Cloning
Two of my most-used tools for any retouching job are the Spot Healing Brush and the Clone Stamp Tool. They might seem alike at first glance, but they play very different roles.
The Spot Healing Brush is your first port of call for quick, easy fixes. It’s like a magic eraser for tiny blemishes.
- Practical Use Case: Imagine a portrait with a few minor skin blemishes.
- How to use it: Select the Spot Healing Brush (J). Adjust the brush size using the
[and]keys so it’s just slightly larger than the blemish. Click once on the spot. Photoshop will analyse the surrounding pixels and blend it away seamlessly.
When you’re facing a bigger challenge, you’ll need the manual control that the Clone Stamp Tool offers. This tool lets you pick a clean “source” area and quite literally paint it over a problem spot.
Step-by-Step Guide: Removing an Unwanted Object
Let’s say you’ve taken a stunning beach shot, but there’s a distracting plastic bottle in the sand.
- Select the Clone Stamp Tool (S).
- Find a clean patch of sand near the bottle. Hold down the Alt key (or Option on a Mac) and click on that clean sand. You’ve just set your source point.
- Release the Alt key. Now, position your cursor over the bottle and start painting. You’ll see the clean sand being painted over the bottle, making it vanish.
- Pro Tip: Keep resampling your source point by Alt-clicking different nearby areas as you paint. This prevents a repetitive, unnatural pattern and makes the final edit look invisible.
Adding Depth with Dodge and Burn
Retouching isn’t always about taking things away. It’s also about enhancing what’s already there to create more depth and focus. Dodge and Burn are techniques that let you selectively lighten (dodge) or darken (burn) parts of your photo.
Actionable Step:
- Create a new layer (
Shift + Ctrl + NorShift + Cmd + N). - In the dialog box, set the Mode to
Overlayand check the box that saysFill with Overlay-neutral color (50% gray). Click OK. - Now grab the Dodge Tool (O). In the top options bar, set Range to
Midtonesand Exposure to5%. - Gently paint over the areas you want to lighten, like the irises of an eye in a portrait.
- Switch to the Burn Tool and paint over areas you want to darken, like the corners of the photo, to guide the viewer’s eye. This method is non-destructive, as all your changes are on the separate grey layer.
Mastering these core retouching skills is a huge step, and it shows why learning how to use Photoshop to edit pictures opens up a world of creative possibilities. For those interested in the future of editing, you might find it worthwhile to look into exploring the exciting possibilities of leveraging Richly AI for personal purposes, especially for automated image improvements.
Where the Real Magic Happens: Layers and Selections
If the basic tweaks we’ve covered are about polishing what’s already there, layers and selections are where you truly start bending reality. This is the point where you graduate from making simple corrections to becoming a digital artist. Getting your head around these two concepts is the key to unlocking the kind of complex, creative edits Photoshop is famous for.
Think of the Layers Panel as your command centre. It’s like stacking transparent sheets over your original photograph. You can paint on one sheet, add text to another, or place a different image on a third, all without permanently damaging the photo underneath.
Nailing Down Selections to Isolate Your Edits
Before you can change just one part of your photo, you have to tell Photoshop exactly which pixels you want to affect. That’s what selections are all about.
Step-by-Step Guide: Changing an Object’s Colour
Let’s imagine you want to change the colour of a blue shirt in your shot to red.
- In the Tools Panel, select the Object Selection Tool.
- Drag a rough rectangle around the blue shirt. Photoshop’s AI will analyse the image and create a precise selection around it.
- With the selection active, go to the Adjustments Panel and click the Hue/Saturation icon.
- A new adjustment layer will appear, with a layer mask automatically created from your selection.
- In the Properties panel, drag the Hue slider left or right. You will see the shirt’s colour change in real-time, while the rest of the image remains untouched.
Blending Worlds with Composites
The true power of layers really clicks when you start blending multiple photos into a single, seamless image—a technique we call compositing. A perfect example is swapping out a boring, overcast sky for a dramatic sunset.
Step-by-Step Guide: Replacing a Sky
- Open your main photo (with the dull sky).
- Open your sunset photo.
- Select the Move Tool (V), then click and drag the sunset image from its window onto your main photo’s window. It will appear on a new layer.
- In your Layers Panel, drag the new sunset layer below your original photo layer.
- Click on your original photo layer to select it.
- Go to the top menu and click
Select > Sky. Photoshop will automatically select the old, boring sky. - With the selection active, click the Add Layer Mask icon (a rectangle with a circle inside) at the bottom of the Layers Panel.
Just like that, the old sky is masked out, revealing the beautiful sunset from the layer below.
The secret to professional-looking Photoshop work isn’t about finding one magic filter. It’s about learning to work on your image piece by piece. Layers and selections give you that pinpoint control, and that’s what makes the difference between an okay edit and a fantastic one.
This is the kind of creative flexibility that has made the software a household name. In Nigeria, for instance, with internet penetration at about 36.2 percent and over 38.7 million social media identities as of early 2025, tools like Photoshop are essential. Digital marketers and creators across the country rely on it daily to make their visual content stand out. You can dive deeper into these trends and explore more about Nigeria’s digital landscape on DataReportal.
Getting Your Finished Images Out of Photoshop
You’ve put in the hard work—tweaking colours, cleaning up distractions, and getting every detail just right. Now, it’s time to get your masterpiece out of Photoshop and ready for the world. How you handle this final step is just as important as any edit you’ve made.
The golden rule is to always save a master copy as a Photoshop Document (PSD). This is non-negotiable. A PSD file keeps all your layers, masks, and adjustment layers intact. It’s your editable blueprint, allowing you to come back and make changes later. To do this, simply go to File > Save As and choose Photoshop (*.PSD) from the format list.
Picking the Best File Format for the Job
With your PSD safely stored, you can now export copies for specific purposes.
Here’s my go-to guide for the most common needs:
- JPEG (JPG): This is the workhorse for almost anything online. It cleverly compresses your image to create a much smaller file. A quality setting between 70 and 80 is usually the sweet spot for web use.
- PNG: Reach for a PNG when you need transparency. If you’ve cut a subject out from its background or are working with graphics and logos, PNG will preserve those transparent areas.
- TIFF: Think of TIFF as the ultimate format for high-quality printing. It’s a “lossless” format that holds onto every last bit of image data, which is what professional printers need.
If there’s one mistake I see beginners make over and over, it’s saving a flattened JPEG over their original file. Please, get into this habit now: Save a PSD for editing, export a JPEG or PNG for sharing. It will save you a world of pain down the line.
Actionable Step: Exporting for the Web
- Go to
File > Export > Export As.... - In the dialogue box on the right, set Format to
JPG. - Adjust the Quality slider to around
80. - Under Image Size, you can enter new pixel dimensions if you need to resize the image for a specific platform.
- Ensure the Convert to sRGB box is ticked. This is the standard colour space for the web and ensures your colours look consistent across different devices.
- Click Export All.
Once you get comfortable with editing, it’s worth taking the time to choose the best image format for web performance to make sure your website stays quick and responsive.
Common Photoshop Questions Answered
Even with the best workflow, you’re bound to run into questions when you’re getting to grips with Photoshop. Let’s walk through a few of the most common snags I see photographers face and get you some quick answers.
What Is the Most Important Thing to Learn First?
If you take only one thing away from this guide, let it be this: learn to use Adjustment Layers. I can’t stress this enough.
When you edit an image directly, you’re permanently baking those changes into the pixels. Adjustment Layers sit on top of your image, letting you tweak things like brightness, contrast, and colour non-destructively. This means you can go back and change your mind, dial an effect up or down, or delete it entirely without ever damaging the original photo. It’s the cornerstone of a flexible, professional workflow.
How Do I Fix a Photo That Is Too Dark or Bright?
Your best friends here are the Levels and Curves Adjustment Layers. For a quick, powerful fix, use Levels.
Practical Example: A photo is too dark.
- Go to the Adjustments Panel and click the Levels icon.
- The properties will show a histogram graph. Find the white slider on the far right.
- Action: Click and drag the white slider to the left until it touches the edge of the data on the graph. This sets a new, brighter white point for your image.
- Next, find the middle grey slider.
- Action: Drag this slider slightly to the left to brighten the overall midtones of the image.
This gives you so much more finesse over your photo’s exposure than a simple brightness slider ever could. It’s worth noting how AI is starting to play a bigger role in these editing tools, a trend we explore more deeply in our article on Niger’s National Artificial Intelligence Policy and its approach to innovation.
A quick pro-tip: Think of Lightroom for your initial, broad-stroke edits across a whole shoot. Photoshop is for the deep, detailed surgery on your best shots. They’re a team, not competitors.
Which File Format Should I Use for Saving?
This completely depends on where the image is going to live. There’s no single “best” format; it’s all about picking the right tool for the job.
- JPEG: For web use (website, blog posts, social media). It hits that sweet spot between good quality and a small, fast-loading file size.
- PNG: When you need a transparent background (logos, icons, or any graphic you need to overlay on something else).
- PSD: This is your master file. Always, always save a layered PSD copy of your work (
File > Save As). It keeps all your layers and adjustments intact so you can make changes later. - TIFF: For professional printing. It’s a high-quality, lossless format that preserves all your image data.
Ready to create stunning visuals and content with ease? Discover how RichlyAI can accelerate your creative process. Start generating high-quality text, images, and more today by signing up for free at https://richlyai.com.