
Making great video content follows a familiar path: you start with strategic planning, move to scripting, then filming, editing, and finally, publishing. When you get this workflow down, you can turn your raw ideas into polished videos that really grab attention and get results, which is essential in a fast-moving market like Nigeria.
Building Your Video Strategy for a Nigerian Audience
Before you even think about pressing the record button, you need a solid strategy. Honestly, it’s the most important part. Rushing into production without a clear plan is like trying to navigate Lagos traffic without a destination in mind—you’ll just waste time, energy, and money. An effective video starts long before the camera rolls; it begins with a deep understanding of who you’re talking to and what you hope to accomplish.
Understand Your Target Viewer
First things first, you have to get to know your Nigerian audience on a deeper level. I’m not just talking about basic demographics. What are their viewing habits really like? Are they scrolling through quick Instagram Reels on their commute, or are they kicking back in the evening to watch longer, more detailed tutorials on YouTube? You need to tune into the local culture—the slang, the inside jokes, the references that make content feel genuine and not like it was made by an outsider.
Actionable Insight: Create a simple “viewer persona.” For example:
- Name: Funke
- Age: 24
- Location: Lagos
- Occupation: Recent graduate, job hunting
- Pain Point: Wants to learn digital marketing skills to be more employable.
- Platform: Spends hours on YouTube watching tutorials and TikTok for fun.
This persona tells you to create practical, “how-to” YouTube videos around digital marketing, maybe with some short, funny, relatable skits for TikTok.
Set Clear and Actionable Goals
Why are you even making this video? If you don’t have a clear goal, you’ll never know if you succeeded. Your main objective will guide every single decision, from the tone of your script to the final call-to-action.
Practical Examples of Goals:
- Brand Trust: A behind-the-scenes video showing how your handmade leather bags are crafted in Aba.
- Education: A step-by-step “How-To” guide on properly filling out a visa application form.
- Conversions: A product demo showing exactly how your new fintech app simplifies paying bills, ending with a “Download the App” link.
- Entertainment: A comedy skit about the struggles of working from home in Nigeria, designed to be shared widely on Instagram.
This visual breakdown really shows why video is such a powerhouse for engagement and turning viewers into customers.
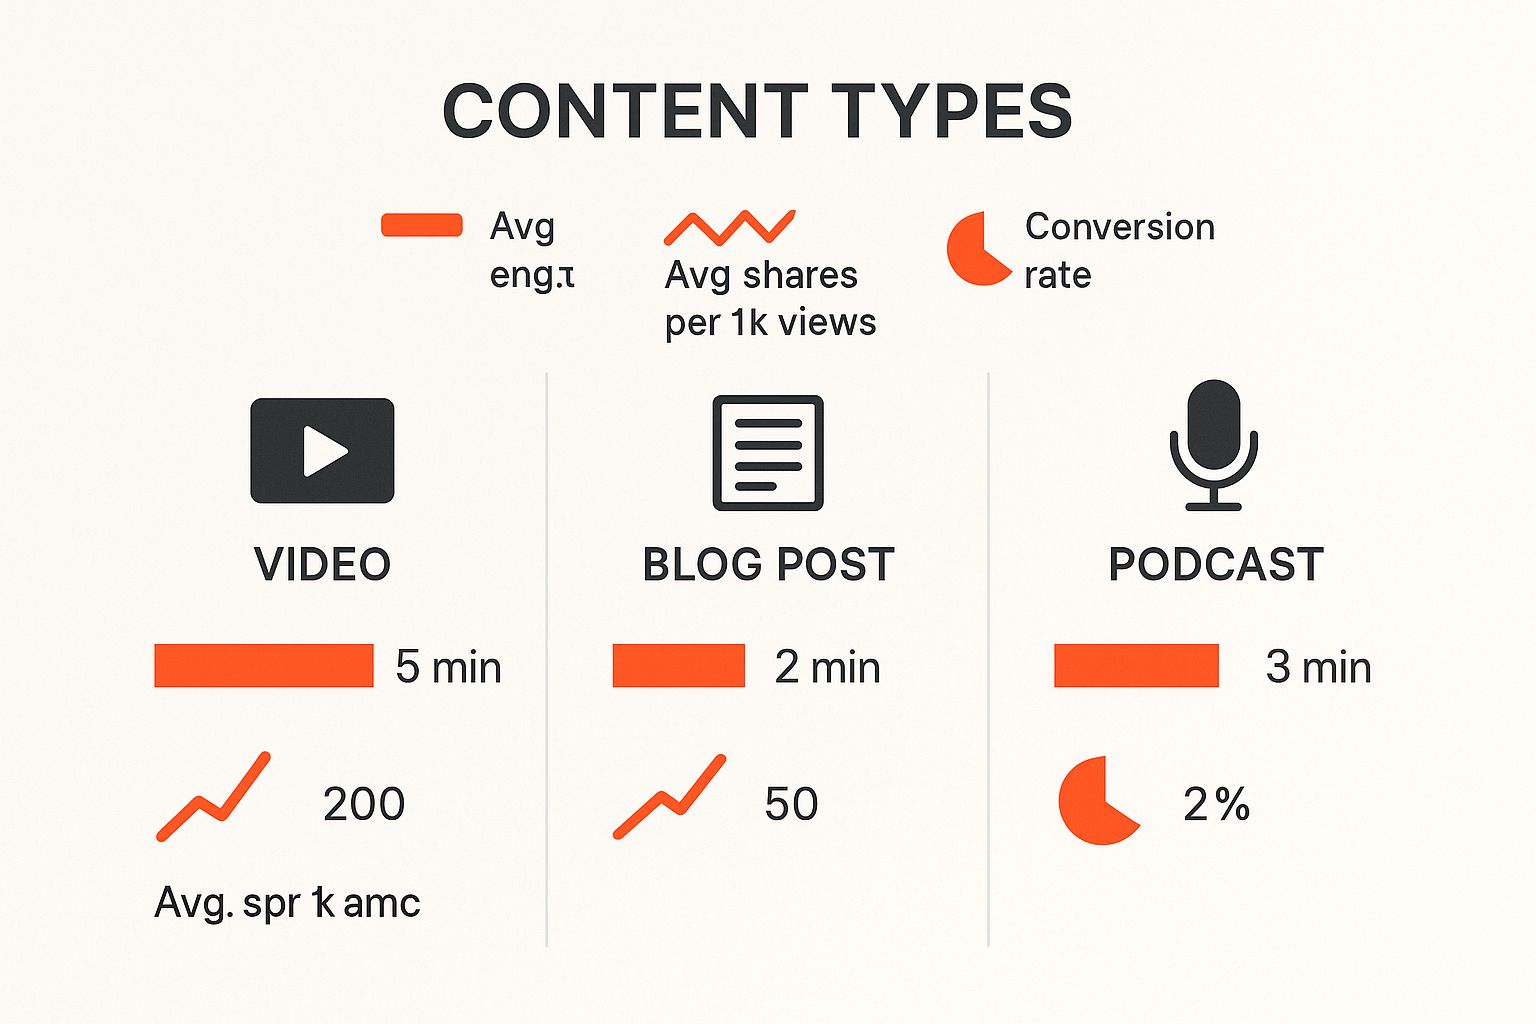
As you can see, video doesn’t just keep people watching longer; it also gets shared more and leads to far more conversions than other types of content.
Video Planning Approaches: A Quick Comparison
Choosing how to plan your video can feel overwhelming. Each method has its place, depending on what you’re trying to create. This table breaks down a few common approaches to help you decide which is the best fit for your next project.
| Approach | Best For | Key Benefit | Practical Example |
|---|---|---|---|
| Full Script | Tutorials, Explainers | Complete control over every word and action. | A video explaining “How to Register a Business with CAC.” |
| Bullet Points | Interviews, Vlogs | Keeps you on track while allowing for spontaneity. | A market vlog at Balogun Market, with points like “Show fabrics,” “Interview a seller.” |
| Storyboard | Visually-driven Ads | Helps visualise the final product shot-by-shot. | A 30-second ad for a new drink, showing specific shots of people enjoying it. |
| Freestyle | Reaction Videos, Live | Authentic and captures genuine moments. | A live Q&A session on Instagram with your followers. |
Ultimately, the best approach is the one that gives you enough structure to be clear but enough freedom to be yourself. Don’t be afraid to mix and match methods to find what works for you.
Validate Your Video Ideas
The Nigerian creative scene is absolutely exploding with talent. The African creator economy is projected to jump from US$5.10 billion in 2025 to a massive US$29.84 billion by 2032, and video is expected to make up over 41% of that market. That’s a massive opportunity, but it also means there’s a lot of competition for eyeballs.
Step-by-Step Guide to Validating Your Idea:
- Brainstorm: List 5-10 video ideas. Example: “How to japa to Canada,” “Best shawarma spots in Ikeja,” “Review of the new Tecno phone.”
- Keyword Research: Use Google Trends. Set the region to “Nigeria.” Type in your ideas. Do you see rising interest? “Japa to Canada” will likely show high search volume.
- Social Listening: Search for your topic on Twitter or in a relevant Facebook group. Are people asking questions about it? This signals a need.
- Ask Your Audience: Post a poll on your Instagram Stories. “What do you want to see next? A) Shawarma review B) Phone review.” Let your audience decide.
While focusing on a Nigerian audience is key, knowing some general content creation strategies will always help you bring in more viewers. If you want to get a head start on brainstorming, you might want to look at our guide on free AI tools for content creation that can help you with ideation and research.
From Idea to Actionable Script and Storyboard

So, you’ve nailed down your strategy. Now for the fun part: turning that big idea into something tangible. This is where you get to translate your vision onto the page, creating a script and storyboard that will guide your entire production. A solid script is your best friend on set—it’s the blueprint that keeps your message sharp and your filming day on track.
The aim here isn’t to write something that sounds stiff or overly corporate. You’re aiming for a natural, conversational feel, almost as if you’re chatting with a friend. That authenticity is what really resonates with viewers and builds a connection, making them far more likely to stick around.
Crafting a Natural Sounding Script
Every great script has a solid structure. It’s what takes your viewer on a journey, from the moment they stop scrolling to the final takeaway. I always think of it in three simple parts: a killer opening, a valuable middle, and a strong finish.
A Step-by-Step Scripting Example (for a “How to Make Jollof Rice” video):
- The Hook (First 3-5 seconds): “Stop making boring Jollof Rice! I’m about to show you the one secret ingredient that will change your party Jollof game forever.”
- The Middle (Deliver Value): Break it down. “First, let’s talk about the pepper base. You’ll need…” Show the ingredients. “Next, the parboiling technique is crucial…” Demonstrate each step clearly. Keep sentences short and direct.
- The Conclusion (Recap & CTA): “And there you have it—perfect party Jollof every single time. If you try this recipe, tag me in your pictures! Don’t forget to like and subscribe for more recipes.”
Expert Tip: Always, always read your script out loud before you finalise it. It’s a simple trick, but it’s a lifesaver. You’ll instantly catch any awkward phrasing or clunky sentences that looked fine on the page but sound completely unnatural when spoken. If it feels weird to say, your audience will definitely think it’s weird to hear.
The Power of AI in Scriptwriting
Let’s be real: writing a script from scratch can feel like a massive hurdle, especially when you’re juggling a dozen other tasks. This is where AI tools can be a genuine game-changer. A platform like RichlyAI Hub can help you brainstorm hook ideas, generate a first draft, or even polish your sentences to sound more conversational.
Practical Example:
- Your Prompt to AI: “Write a script for a 1-minute Instagram Reel about 3 common mistakes people make when applying for a Nigerian passport online. The tone should be helpful and friendly.”
- AI Output: A structured script with a hook, three points, and a call-to-action that you can then edit and infuse with your own personality.
With your script polished, it’s time to think about scheduling. Staying organised is crucial, and our guide on creating a social media content calendar is a great resource for planning when each video should go live for the biggest splash.
Visualising Your Story with a Storyboard
Script done? Great. The next step is to create a storyboard. And no, you don’t need to be an artist for this. A storyboard is simply a sequence of rough sketches that map out each shot of your video. It’s your visual roadmap. Its real job is to help you see the final video in your head before you even pick up a camera.
Simple Storyboard Example (for the Jollof video):
- Panel 1: (Close-up shot) Sketch of hands holding a jar labelled “Secret Ingredient.” VOICEOVER: “Stop making boring Jollof Rice!”
- Panel 2: (Wide shot) Sketch of a person standing at a clean kitchen counter with all ingredients laid out. VOICEOVER: “First, let’s talk about the pepper base.”
- Panel 3: (Extreme close-up) Sketch of peppers going into a blender. SOUND EFFECT: Blender noise.
- Panel 4: (Medium shot) Person smiling and holding up a finished plate of Jollof rice. TEXT OVERLAY: “Perfect Party Jollof!”
Storyboarding is like building a paper prototype of your video. It helps you catch problems early, refine your visual storytelling, and communicate your ideas clearly to anyone else involved.
Your Guide to Filming High-Quality Video
Alright, you’ve got your script and storyboard mapped out. Now for the exciting part: actually filming. Look, getting great footage isn’t about owning the most expensive camera. The real magic comes down to a few core principles that anyone can learn. What truly separates amateur from professional-looking video is how you handle your lighting, sound, and shot composition.
Mastering Your Lighting Setup
Lighting does more than just make things visible; it sets the entire mood and gives your video that polished, professional sheen. Bad lighting will make even the best camera footage look grainy and cheap.
Actionable Tip: If you don’t have fancy lights, your best friend is a large window.
- Step 1: Place your camera or phone on a tripod or stack of books.
- Step 2: Position yourself so you are facing the window. The natural light should illuminate your face.
- Step 3: If one side of your face is too dark, use a white piece of cardboard or a reflector (even a cheap one) on that side to bounce light back and “fill in” the shadows. This is a simple DIY version of a fill light.
If you are using artificial lights, the three-point lighting setup is the gold standard:
- Key Light: Your main light, placed at a 45-degree angle to your face.
- Fill Light: A softer light on the opposite side to soften shadows.
- Back Light: Placed behind you to separate you from the background.
Why Clear Audio is Non-Negotiable
Your audience will forgive slightly grainy video. They will not forgive bad audio. The single best investment you can make to improve your video quality is a dedicated external microphone.
Practical Tip: For videos where you’re talking to the camera, a simple lavalier mic (the little one that clips to your shirt) is an absolute game-changer. You can get a good one online for under ₦15,000. Clip it to your collar, about 6-8 inches from your mouth, run the wire under your shirt, and plug it into your phone or camera. This instantly elevates your sound quality above 90% of amateur videos.
Also, record in a quiet room with soft furnishings like curtains, rugs, or a bed to absorb echo. A classic DIY trick is to record inside a closet full of clothes for perfectly deadened sound.
Composing Visually Appealing Shots
The way you frame your subject—your composition—is how you tell the viewer where to look. The easiest principle is the rule of thirds. Imagine a tic-tac-toe grid over your screen. Place key elements on the lines or intersections.
Practical Application:
- Step 1: Turn on the “grid” feature in your phone’s camera settings.
- Step 2: When filming yourself, position your body along one of the vertical lines.
- Step 3: Align your eyes with the top horizontal line. This simple framing makes your shot look instantly more professional and balanced.
Practical Setups for Common Video Types
How does this all come together? Here’s a step-by-step guide for common setups.
1. The Polished Talking-Head Video:
- Step 1: Place your phone/camera at eye level on a tripod.
- Step 2: Sit facing a large window for soft natural light.
- Step 3: Clip a lavalier mic to your shirt.
- Step 4: Frame yourself using the rule of thirds.
- Step 5: Before recording, do a quick test shot to check your lighting and audio levels.
2. The Engaging Product Demo:
- Step 1: Use a clean, non-distracting background (like a solid-coloured wall or sheet).
- Step 2: Get a wide shot showing the entire product.
- Step 3: Move the camera closer to get detailed “close-up” shots of key features.
- Step 4: Film a “top-down” shot by placing the product on a table and carefully shooting from directly above.
- Step 5: Use a shotgun mic mounted on the camera to capture clear sound without it being in the frame.
3. The Dynamic ‘On-the-Street’ Vlog:
- Step 1: Attach your smartphone to a gimbal for smooth, non-shaky footage.
- Step 2: Attach a small shotgun mic with a “deadcat” (the fluffy cover) to cut wind noise.
- Step 3: Film yourself talking (A-roll), but remember to capture lots of shots of your surroundings (B-roll) to edit in later. This makes the vlog more engaging.
Focus on these three pillars—lighting, audio, and composition—and you’ll be creating videos that look and sound fantastic.
Turning Raw Footage into a Polished Final Cut
The edit is where the real magic happens. This is your chance to take a jumble of disconnected clips and weave them into a story that grabs your audience. Post-production might feel like a mountain to climb, but it’s really just a series of logical steps. Once your footage is ready, finding the best video editing software is your next move.
Step-by-Step Editing Workflow
Step 1: Organise Your Footage First
Before importing anything, create a main project folder on your computer. Inside it, make subfolders: “Raw Footage,” “Audio,” “Music,” “Graphics,” and “Final Renders.” Move all your files into the correct folders. This 10-minute habit prevents chaos.
Step 2: Assemble Your Rough Cut
This is the skeleton of your video.
- Import your “A-roll” (your main talking clips) into your editing software.
- Drag them onto the timeline in the correct order according to your script.
- Cut out the obvious mistakes, long pauses, and sections where you went off-topic.
- Don’t worry about smooth transitions yet. The goal is just to make sure the story flows logically.
Step 3: Refine with B-Roll and Precise Cuts
Now, make it visually interesting.
- Import your “B-roll” (your supporting shots).
- Drag and drop B-roll clips over your A-roll. For example, when you say “chop the onions,” cover your talking-head clip with the video of you actually chopping onions.
- This is the perfect way to hide cuts in your A-roll where you stitched two takes together.
- Refine your pacing. Cut out “ums” and “ahs.” Use J-cuts (where audio from the next clip starts before the video) and L-cuts (where the previous clip’s audio continues over the new shot) to make the edit feel seamless.
Step 4: Enhance Visuals and Audio
Time for polish.
- Colour Correction: Go through each clip and adjust brightness, contrast, and white balance so they all look consistent. Most simple editors have “auto-correct” buttons that do a decent job.
- Colour Grading: Apply a filter or “LUT” to give your video a specific mood. A warm, orange-and-teal look is popular for a cinematic feel.
- Audio Mixing: Adjust the volume levels. Your voiceover should be loudest. Drop the background music volume way down whenever you’re speaking.
- Add Music & Sound Effects: Place your background music track on the timeline. Add simple sound effects like a “whoosh” for text appearing on screen to make the video more dynamic.
Step 5: Add Text and Subtitles for Retention
This is the final layer.
- Add your intro/outro, lower-third titles (text that introduces you or a topic), and your logo.
- Generate Subtitles: A huge portion of viewers watch with the sound off. Use your editing software’s built-in captioning tool or a service like RichlyAI to automatically generate subtitles. Review them for accuracy and make sure they are easy to read. You can see how AI for content creation is revolutionizing this part of the process.
How to Publish and Promote Your Video for Success
So, you’ve created a fantastic video. The work isn’t over just because the edit is locked. A great video deserves to be seen, and that’s where smart publishing and promotion come into play. Just hitting ‘publish’ and hoping for the best is a recipe for disappointment. You need a solid plan to get your content in front of the right people.
Choosing the Right Platform
Where should your video live? It depends on your content and audience.
- YouTube: Best for detailed tutorials, reviews, and vlogs (e.g., “A Full Guide to Investing in Nigerian Stocks”).
- Instagram (Reels & Feed): Ideal for quick tips, behind-the-scenes, and product showcases (e.g., a 60-second video on “How to Style One Ankara Scarf 3 Ways”).
- TikTok: Perfect for trends, comedy, and creative challenges (e.g., a funny skit on “Lagos Danfo Bus Experiences”).
- Facebook: Excels at community building and content that sparks discussion (e.g., a live video Q&A about starting a small business).
Actionable Strategy: Create a 10-minute “pillar” video for YouTube. Then, cut it into three 60-second “highlight” clips for Reels/TikTok and one 2-minute version for Facebook, all directing viewers back to the full YouTube video for more details.
Mastering Video SEO and Thumbnails
Getting discovered is a massive part of learning how to create video content that actually succeeds. Here’s a step-by-step guide to optimizing your YouTube video:
- Title: Be specific. Instead of “My Skincare Routine,” use “My 5-Minute Morning Skincare Routine for Oily, Acne-Prone Skin (Nigerian Weather).”
- Description: Write a short paragraph describing the video’s value. Include your main keywords. Add timestamps so viewers can skip to sections. Add links to products or your social media.
- Tags: Use a mix of broad and specific tags. Examples: “skincare,” “Nigerian skincare,” “oily skin routine,” “skincare for black women,” “how to prevent acne.”
- Thumbnail: This is crucial. Use a bright, high-contrast photo. Include your face with an expressive emotion. Add 3-5 words of bold, easy-to-read text like “OILY SKIN SAVIOUR!”
Promoting Your Video Beyond Publishing
Hitting ‘publish’ is the starting line. Now it’s time to promote.
A Practical Promotional Checklist:
- Email List: Send an email to your subscribers with a link to the new video.
- Social Media: Create a short, punchy teaser clip and post it natively to Instagram, TikTok, and Twitter, telling people to “click the link in bio for the full video!”
- Embed on Your Blog: Write a short blog post on the same topic and embed your YouTube video directly into it.
- Community Sharing: Find a relevant Nairaland thread or Facebook group. Write a helpful comment and add, “By the way, I made a detailed video on this if you want to see the steps.”
- Collaborate: DM another creator in your niche and suggest a collaboration or a simple “shout-out for shout-out.”
To really squeeze every drop of potential out of your video, make sure your publishing strategy aligns with the latest top social media posting best practices.
Addressing the Reality of Data Costs
For Nigerian creators, we can’t ignore the cost of mobile data. The average cost of 1GB of mobile data in Nigeria shot up by a staggering 65.22% to ₦475 between 2023 and 2025. This means viewers are careful with their data.
Actionable Solutions:
- Keep it Concise: Edit ruthlessly. Cut any fluff so your video is packed with value.
- Use Timestamps: Add timestamps in your YouTube description (e.g., 0:00 Intro, 1:15 Step 1, 3:20 Final Results). This lets viewers jump to the part they need, saving them data and time.
- Optimize for Mobile: Export your video in a data-friendly resolution like 720p or 1080p. 4K is often unnecessary and eats up data.
Common Questions About Video Creation in Nigeria
Diving into video creation can feel like you’re navigating a maze. I get these questions all the time, so let’s clear up some of the most common ones with practical answers.
How Much Do I Really Need to Spend?
You can start with a ₦0 budget. Your smartphone is your camera. A window is your light. Free editing apps like CapCut or InShot are incredibly powerful.
Your First Smart Investment (Under ₦20,000):
- Lavalier Microphone (approx. ₦10,000-15,000): This is the single biggest upgrade you can make. Good audio makes you sound like a pro instantly.
- Basic Tripod (approx. ₦5,000): This stops shaky footage and lets you film yourself without needing someone to hold the camera.
Forget expensive gear until you’re consistently creating and have an audience.
Which Platform is Best for a Nigerian Audience?
There’s no single “best” platform—it all comes down to your content style.
- YouTube: For teaching something in detail (e.g., “How to Code for Beginners”).
- Instagram & TikTok: For quick, entertaining, or visually appealing content (e.g., “My Top 3 Cafes in Lagos”).
- Facebook: For building a community around a shared interest (e.g., a group for Nigerian bakers).
Actionable Insight: The best strategy is to use multiple platforms. Post your main video on YouTube, then create short teaser clips for Instagram and TikTok to drive traffic to the full video. This is how you master the art of creating video content that works everywhere.
The reality is that video marketing is the leading content strategy for Nigerian brands right now, shaping both production and consumption habits. Businesses are increasingly using formats like explainer videos and live streams to connect with their audience. You can discover more insights about 2024 Nigerian digital marketing trends on Xplicitmode.
How Can I Stand Out in a Crowded Market?
The secret is to “niche down.” Don’t be a generic “lifestyle vlogger.” Be specific.
Practical Niche Examples:
- Instead of “Food Vlogger,” be the “Nigerian Student-Friendly Budget Meals Vlogger.”
- Instead of “Tech Reviewer,” be the “Reviewer of Tech Gadgets You Can Actually Buy at Computer Village.”
- Instead of “Fashion Influencer,” be the “Influencer Who Shows How to Thrift Stylish Outfits at Yaba Market.”
Authenticity is your superpower. Your unique personality, sense of humour, and perspective are things no one else can copy. Combine a specific niche with your genuine personality to build a loyal community. And remember, consistency is key. Posting regularly keeps your audience engaged.
Now that we’ve covered some common ground, you might still have a few specific questions. I’ve put together a quick table to answer some more queries I often hear.
| question | answer |
|---|---|
| How long should my videos be? | For YouTube, aim for 8-15 minutes for good engagement and ad revenue potential. On TikTok and Instagram Reels, keep it under 60 seconds, with the first 3 seconds being the most critical. |
| What’s the best time to post? | This depends on your audience analytics. Generally, evenings (6 PM – 9 PM) and weekends are strong starting points, but always check your platform’s insights for data specific to your followers. |
| Do I need to show my face? | Not at all! Faceless channels focusing on tutorials (like screen recordings of software), animations, or voice-overs with stock footage are incredibly successful. Focus on providing value. |
| How do I handle negative comments? | It’s part of the journey. Step 1: Read the comment—is it constructive criticism or just hate? Step 2: If constructive, thank them for the feedback. Step 3: If it’s a troll, ignore or use the “hide user from channel” button. Never let it stop you. |
Hopefully, these answers give you a clearer path forward. The most important thing is to just start creating.
Ready to take your video creation from a script idea all the way to a published post? RichlyAI offers a suite of AI tools designed to help you generate ideas, write compelling scripts, and even automate your social media scheduling. It saves you time and makes your content shine. Explore what you can create at RichlyAI.