
Ever found yourself trying to explain a tech issue to a family member over the phone, or wanting to save a fleeting video from your social media feed? The iPhone’s built-in screen recorder is your secret weapon for exactly these moments. But first, you’ve got to make it easy to find.
The trick is to add the screen record button to your Control Centre. You know, that handy menu you pull down from the top-right corner of your screen. This little tweak means you’re always just a swipe and a tap away from capturing anything on your display. No more fumbling through menus when you need to act fast.
Your Quick Guide to iPhone Screen Recording
This feature has been a game-changer for iPhone users in Nigeria and across the globe ever since it rolled out with iOS 11. It’s just so convenient. All you have to do is pop into your Settings and add the ‘Screen Recording’ control. Once that’s done, the record icon is right there waiting for you.
The real power of the screen recorder is its immediacy. Once it’s in your Control Centre, you are always just one second away from capturing exactly what you see on your screen.
Think about how you could use this. You could create quick tutorials, save epic gameplay moments, or even record a video call (with permission, of course!). It’s the first step to creating all sorts of useful video content straight from your phone.
For those looking to weave screen recordings and other digital tools into a bigger content strategy, diving into more advanced platforms can be a huge help. For instance, you can discover more about AI-powered content creation tools on RichlyAI.
Enabling Screen Record in Under a Minute
For a super-fast overview, this table breaks down the entire setup process. It’s a simple, one-time task that takes less than a minute.
| Action | Where to Go | What to Do |
|---|---|---|
| Open Settings | On your iPhone’s Home Screen | Tap the grey gear icon. |
| Find Control Centre | In the main Settings menu | Scroll down a bit and tap on ‘Control Centre’. |
| Add the Feature | Under ‘More Controls’ | Find ‘Screen Recording’ and tap the green ‘+’ icon next to it. |
| Confirm it’s There | Swipe down from the top-right | You should now see the circular record icon in your Control Centre. |
And that’s it! With the button now in your Control Centre, you’re all set to start recording your screen whenever you need to.
Getting the Record Button into Your Control Centre
Before you can start capturing your screen, you need to make the recording button easy to get to. The handiest spot for it is your iPhone’s Control Centre—that’s the menu you pull down from the top-right corner of your screen. It’s a simple, one-time setup that means you’re always just a swipe away from recording.
Think of it like putting your favourite app on your home screen. Why go digging through menus when you can have the tool right there? This little tweak makes the whole process so much smoother.
A Step-by-Step Guide to Adding the Button
Here is a simple, actionable guide to get the record button into your Control Centre:
- Open the Settings App: Find and tap the grey gear icon on your home screen.
- Navigate to Control Centre: Scroll down the main settings list and tap on ‘Control Centre’.
- Locate ‘More Controls’: You’ll see two lists. The top one, ‘Included Controls’, shows what’s already in your Control Centre. The bottom one, ‘More Controls’, shows available options.
- Add Screen Recording: Scroll through the ‘More Controls’ list until you find ‘Screen Recording’. Tap the green ‘+’ button to its left.
- Verify: The ‘Screen Recording’ option will now appear in your ‘Included Controls’ list. To see it in action, swipe down from the top-right of your screen to open the Control Centre. You’ll see the new record icon (a circle within a circle).
This next image walks you through exactly how to get the record icon showing in your Control Centre.
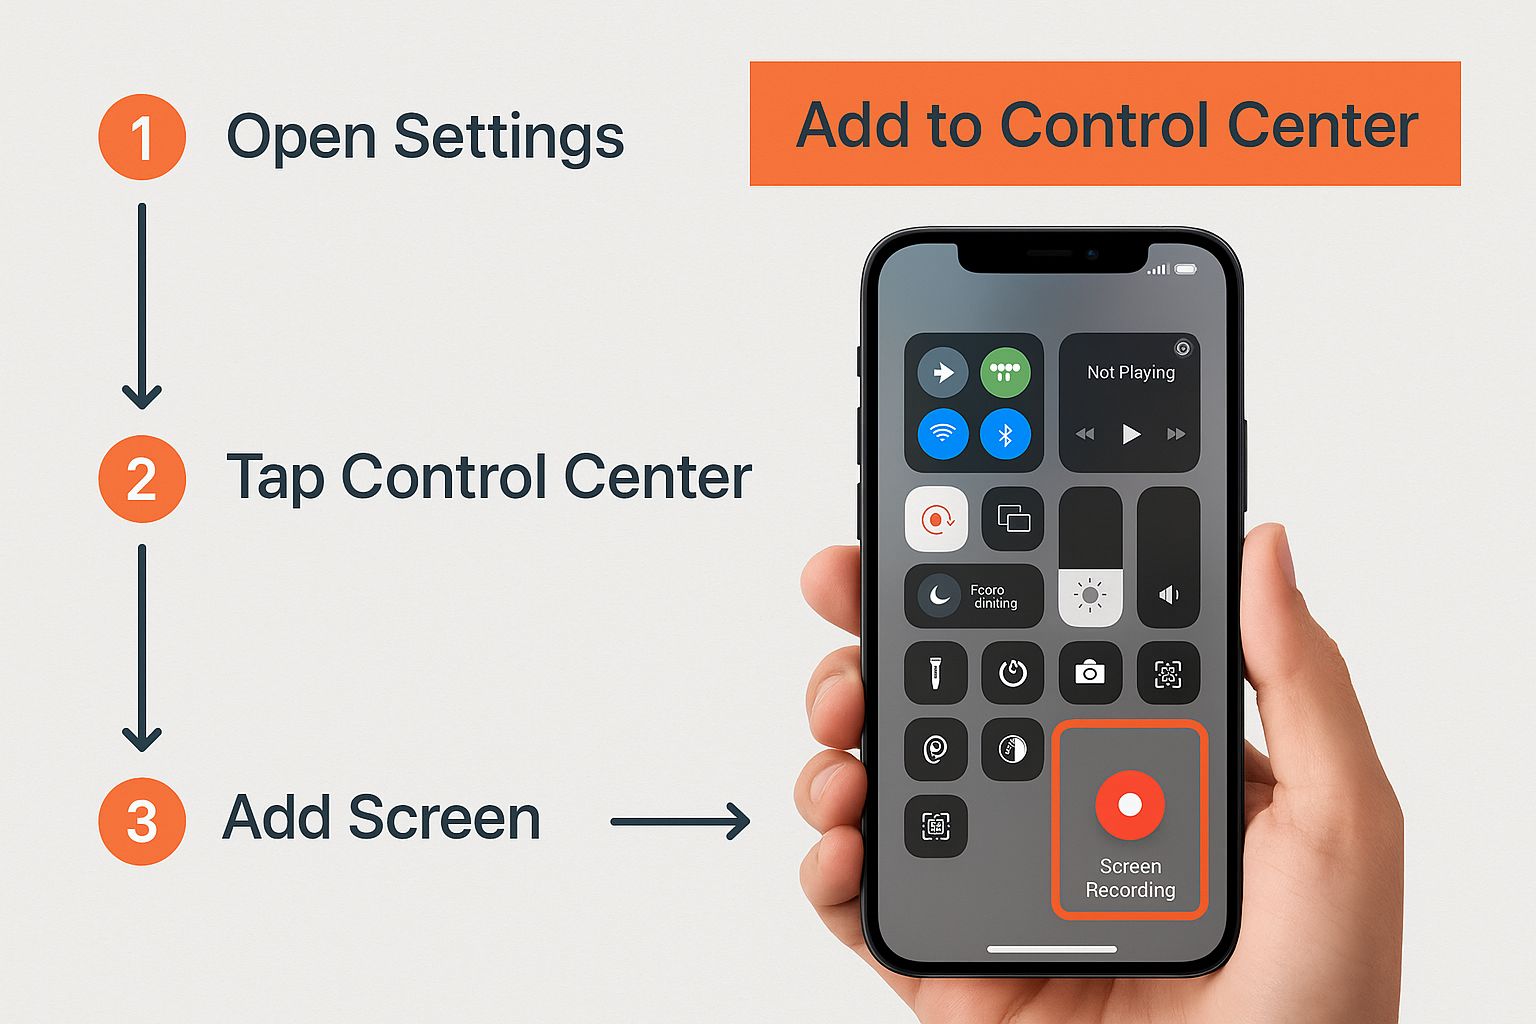
As you can see, it’s incredibly straightforward to add the button and make it a permanent fixture in your quick-access toolkit.
Customizing Your Control Centre
Now that you’ve added the button, you can customize its position for even faster access.
Actionable Tip: Once you’ve added it, you can change the order of your icons. Press and hold the three little lines next to any control and drag it up or down. I like to keep my record button near the top so I can find it instantly without having to scan the whole menu.
With the button now in place, you’re officially set up and ready to start recording. It’s a bit like learning the fundamental steps you need to start using AI without any experience; getting the basics right makes everything else much easier.
How to Record Your Screen with Audio
A screen recording without sound often misses the point entirely. Think about it – you wouldn’t watch a film on mute. Whether you’re creating a quick tutorial, saving some gameplay highlights, or recording a video call to remember the details later, capturing audio is crucial.
Your iPhone can actually record two different types of audio:
- Internal Audio: Sound produced by your iPhone, such as game sounds, app notifications, or video playback audio.
- External Audio: Sound captured by your iPhone’s microphone, like your voice or ambient noise.
Out of the box, the screen recorder is set to capture only your screen and the internal sounds. If you want to add your own commentary, you’ll need to manually switch on the microphone.
Step-by-Step: Enabling Your Microphone for Narration
The setting to include your voice is hidden in plain sight, and it’s a simple trick that catches a lot of people out. The key isn’t just tapping the icon; it’s a long-press.
Here’s the step-by-step process:
- Open Control Centre: Swipe down from the top-right corner of your screen.
- Access Recording Options: Find the screen record button (the grey circle). Press and hold the icon for a second or two. This will open a new options menu.
- Turn on the Microphone: At the bottom of this menu, you’ll see a microphone icon. Tap it. It’ll turn red and the text will change to “Microphone On”.
- Start Your Recording: With the microphone enabled, tap “Start Recording”. A 3-second countdown will begin before the recording starts.
That’s it. From now on, your iPhone will record both what’s on the screen and any sound its microphone can hear. This is perfect for talking a friend through a process, commentating on a game, or showing a developer a bug you’ve found.
A quick heads-up: Your iPhone remembers this setting. The next time you go to screen record, the microphone will still be on. To go back to a silent recording, just repeat the long-press and tap the red microphone icon to turn it off.
Common Audio Problems and Actionable Fixes
Hit record only to find your final video is completely silent? It happens to the best of us, but the fix is usually pretty straightforward.
- No Internal Audio: Some apps, particularly video streaming services, will block audio recording to protect their copyrighted content. Practical Example: If you’re trying to record a scene from the Netflix or Disney+ app, you’ll probably get video but no sound. This is due to DRM (Digital Rights Management) and is not a bug.
- No External Audio: You were sure you turned the mic on, but your voice is nowhere to be heard? Actionable Step: Before re-recording, take your phone out of its case. Check that the case isn’t physically blocking the tiny microphone port at the bottom of your iPhone, next to the charging port.
- Low Volume: If the sound from an app seems too quiet in your recording, make sure your iPhone’s ringer/media volume is turned up while you are recording. Practical Example: Before you start recording a game, use the side volume buttons to increase the volume to maximum. The recording’s volume is often linked to the device’s live volume level.
Pro Tips for Better Screen Recordings
Knowing how to start a screen recording is one thing, but making it look polished and professional is another game entirely. A few simple tweaks can take your clips from a quick, messy capture to a clean, easy-to-follow video. Trust me, these small adjustments make a massive difference.
One of the best things you can do for clarity, especially when making a tutorial, is to show your audience exactly where you’re tapping.
Use AssistiveTouch to Show Your Taps
Ever watched a tutorial and struggled to see where the creator was tapping? AssistiveTouch solves this by placing a small, circular on-screen button that acts as a visual stand-in for your finger. It moves where you move and highlights where you tap, giving your viewers a clear visual cue to follow.
Here’s the step-by-step guide to turn it on:
- Go to Settings > Accessibility > Touch.
- Tap on AssistiveTouch at the top.
- Toggle the switch for AssistiveTouch to the “on” position.
- A grey circular button will appear on your screen, which will now be visible in your recordings.
Get Rid of Unwanted Interruptions
Nothing ruins a perfect take faster than a random notification popping up right in the middle of your recording. A quick text or a social media alert can be super distracting and might even force you to start all over again. The easiest fix? Focus Mode.
Actionable Insight: Before you hit record, swipe down to open your Control Centre and tap the ‘Focus’ button (it may show a moon icon for Do Not Disturb). Select ‘Do Not Disturb’ to silence all incoming alerts, guaranteeing your recording is clean and interruption-free.
Practical Example: I have a dedicated ‘Recording’ Focus Mode set up. It silences everything except calls from my essential contacts. This way, I avoid minor pop-ups without worrying about missing a genuine emergency. You can set this up in Settings > Focus.
Making these small adjustments is a key part of learning how to create engaging tutorial videos that people will actually watch to the end.
Manage Your Screen Orientation
Finally, think about the layout of your final video before you even start. If you’re recording an app that’s meant to be used horizontally, like a game or a video editor, lock your screen orientation first.
Step-by-Step:
- Swipe down to open the Control Centre.
- Tap the Portrait Orientation Lock icon (it looks like a lock inside a circular arrow). When it’s active (usually red or white), your screen will not rotate.
- This simple action stops the screen from unexpectedly flipping if you tilt your phone, keeping your video’s framing consistent and professional.
Creating clear, well-framed content is a universal principle, whether you’re recording your screen or exploring how to apply new creative tools, much like understanding generative AI for empowering creativity in Nigeria.
Editing and Sharing Your Recordings
Once you’ve stopped recording, your video lands straight in the Photos app. But let’s be honest, that raw footage probably isn’t ready for prime time. Most recordings have those awkward few seconds at the beginning and end where you’re fumbling with the Control Centre.
Thankfully, you don’t need fancy software to clean this up. Your iPhone has everything you need built right in, letting you turn a rough take into something polished and professional in just a few taps.
Step-by-Step Guide to Trimming Your Video
The first and most important edit is a simple trim. This is where you snip off the messy start and finish, leaving only the good stuff for your audience to see.
Here’s the step-by-step process:
- Open the Photos app and find your screen recording.
- Tap on the video to open it, then tap “Edit” in the top-right corner.
- You’ll see the video timeline at the bottom, with yellow handles at each end.
- Drag the left handle to the right to trim the beginning. Drag the right handle to the left to trim the end.
- Press the play button to preview your edit.
- Once you’re happy, tap “Done,” and choose to either “Save Video” (which overwrites the original) or “Save Video as New Clip”.
Often, that’s all it takes! While you’re in the editing screen, you can also tap the crop icon to reframe the video or even apply a filter to change the mood, just like you would with a photo. As creating digital content becomes more common, it’s also worth staying informed on related topics, such as the ethical use of AI in the workplace, to keep your digital skills sharp.
Sharing Your Recording Effectively
With your video trimmed and ready, sharing is the final step. For sending it to a friend’s iPhone or your own Mac, nothing beats AirDrop. It’s incredibly fast and, more importantly, preserves the video’s original quality without any compression.
Actionable Tip: Sharing larger recordings or sending them to non-Apple users? Your best bet is to upload the file to a cloud service like Google Drive or iCloud Drive and just share the link. This gets around the annoying file size limits and quality reduction you often run into with messaging apps like WhatsApp.
And if you’re posting to social media, you’re in luck. iPhone screen recordings are automatically captured in a 9:16 vertical aspect ratio—the perfect fit for platforms like Instagram Stories and TikTok, so you won’t have to do any extra resizing.
Got Questions About Screen Recording? Let’s Clear Things Up
Even a straightforward tool like the iPhone’s built-in screen recorder can throw you a curveball now and then. Getting ahead of the common hiccups can save you a world of frustration. Let’s walk through some of the questions that pop up most often.
A classic problem is a recording that just stops on its own. Nine times out of ten, this is your iPhone telling you it’s run out of storage. Video files, especially long ones, are hungry for space, so it’s always a good idea to check you have plenty of free gigabytes before hitting record.
Why Did My Recording Come Out Black or with No Sound?
It’s a frustrating moment: you finish a recording, open the file, and all you see is a black screen. This usually happens when you’re trying to record from a streaming service like Netflix. It’s not a bug, but a deliberate feature called Digital Rights Management (DRM) that prevents you from capturing copyrighted material. There’s no real workaround for this, I’m afraid.
What about silent movies? If your video is perfect but the app audio is missing, take a quick look at the silent switch on the side of your iPhone. Flipping your phone to silent mode can often mute the internal audio in your recordings too. For a deeper dive into your device’s sound options, it’s helpful to understand managing other iPhone audio settings like Text to Speech.
Is There a Time Limit on Recordings?
Officially, iOS doesn’t impose a time limit on how long you can record your screen. The real constraints are much more practical: your iPhone’s available storage and its battery life. The longer you record, the more space you’ll use and the faster your battery will drain.
It’s fascinating to see how this feature is used in different places. In Nigeria, for instance, it’s estimated that as of 2024, over 60% of smartphone users have used screen recording to create content. But because the native tool is quite basic, many creators eventually switch to third-party apps for better features like custom resolutions and built-in editors. You can discover more insights about these usage trends and how people are getting creative.
Actionable Insight: My personal rule of thumb is to keep recordings short and focused. If I know I’ll be recording for more than 15-20 minutes, I always plug my phone into a power source and double-check that I have at least a few gigabytes of free space to work with. You can check your storage in Settings > General > iPhone Storage.
Knowing how to handle these common snags makes the whole process smoother. As tech gets more woven into our lives, from simple screen captures to more complex tools, it pays to be curious. If you’re interested in the bigger picture of technology, you might enjoy our article: Artificial Intelligence Explained a Fun Journey From Past to Future for Curious Minds.
Unlock your creative potential with RichlyAI. Our platform offers a suite of AI-powered tools to help you create high-quality text, images, and code effortlessly. Sign up for a free plan today and see how easy content creation can be at RichlyAI.